With NVIDIA enjoying vast popularity among users, most computers come equipped with their graphics processing units. The device drivers and the control panel for the same are regularly updated as well. But there are times when users get an error message for the NVIDIA components.
One such error is when users get the following error message:
“Preferred graphics processor missing”
Instead, some users have also reported that they do not get to choose their graphics processor in the NVIDIA control panel. It may also manifest as the GPU missing from the device manager as well.
Also read:
How To Fix Preferred Graphics Processor Missing Error Message?
When you get this error message for NVIDIA graphics components, it means that your operating system cannot detect the GPU attached to your motherboard. The most common reason why you may get this is because of corrupt or missing device drivers. However, you may also get this due to connection problems between the GPU and motherboard, or worse, faulty GPU.
Solution 1: Reattach The GPU Unit
If you see the preferred graphics processor not showing on a desktop CPU, you can start troubleshooting this by reattaching the graphics unit. It is possible that some dust particles may be tampering with the connection, or the GPU might have become loose due to some reason.
Note: Disassemble your CPU only if you are comfortable handling delicate computer parts. Also, make sure to remove the power cable and take appropriate measures to prevent electrical hazards.
To access the motherboard, you will need to remove the side panels, and possible the front or back panel depending on the model of your case. Next, remove the GPU and pull it aside. Clean the connector pins on both your GPU and your motherboard.
Once you make sure that no dirt particles may tamper with the connection, insert the GPU back to your motherboard and power up your computer. You should see the corresponding option in the NVIDIA control panel.
Solution 2: Disable The Built-In GPU
Sometimes in Windows 10, when there are one or more discrete GPUs connected to the motherboard, the operating system fails to switch between the integrated graphics and the discrete graphics for different tasks. In situations like these, you may see the preferred graphics processor option missing from the NVIDIA control panel or the device manager as well.
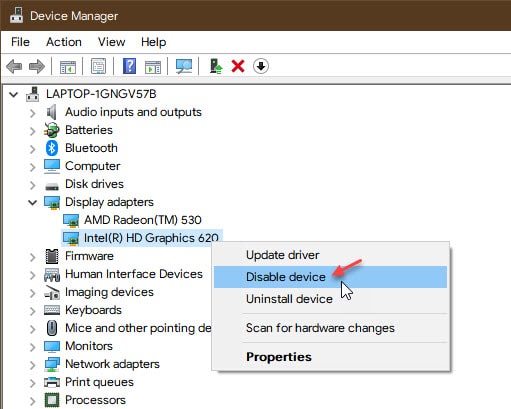
In situations like these, you can try disabling the integrated GPU to use the discrete graphics for every graphics related task. This needs to be done from the device manager, so follow these steps for the same:
- In Windows Search, search for Device Manager and press Enter upon selecting the appropriate option.
- Expand the Display adapters section by clicking the small arrow next to it.
- Right-click on the built-in graphics adapter to reveal the additional menu.
- Select Disable device from the context menu.
- Restart your computer.
Upon restart, your discrete GPU should be used for all purposes, and you should see your preferred graphics adapter in the NVIDIA control panel as well.
Solution 3: Update Drivers Manually
If disabling the integrated display adapter did not help you solve the error and you see NVIDIA control panel not showing options, you need to update the drivers manually. NVIDIA has a huge library of relevant device drivers that is accessible to everybody.
Visit the NVIDIA downloads page, select your device and download the latest drivers for your device. Install the drivers you just downloaded, and your error should now be resolved. You can also try restarting the Graphics driver, which has fixed this issue for some users. Head over here to learn more about it.
Wrapping Up
So there you have it. Now you know how you can proceed to troubleshoot when you see NVIDIA control panel preferred graphics processor missing. Comment below if you found it useful, and to discuss further the same.
I’ve tried everything and still nothing
I have the same problem bro, Have you found the solution?