Though screen saver is an outdated feature now and if you have LCD monitor, you will not need this option.
For the CRT monitor you need your screen saver. Actually, screen saver helped the old monitor versions prevent develop dead pixels.
But in order to make that work again, I will provide some help through this article. It will help you to fight the Windows 10 screensaver not working issue.
Also read: Screen Resolution Keeps Changing In Windows 10 – How To Fix?
What Causes Windows 10 Screensaver Not Working Issue?
Sometimes when you upgrade your Windows to Windows 10 version, you may encounter Windows 10 screensaver not working error.
Something might have stopped the screen saver from working. Sometimes due to this problem your device may stop working.
For an instant help you can try restarting your device. Now, check out this article to find out some steady solutions to the problem.
Fix 1: Check The Configuration In The Settings
Sometimes the screen saver may not be properly configured and so you may face Windows 10 screensaver won’t start types of problems.
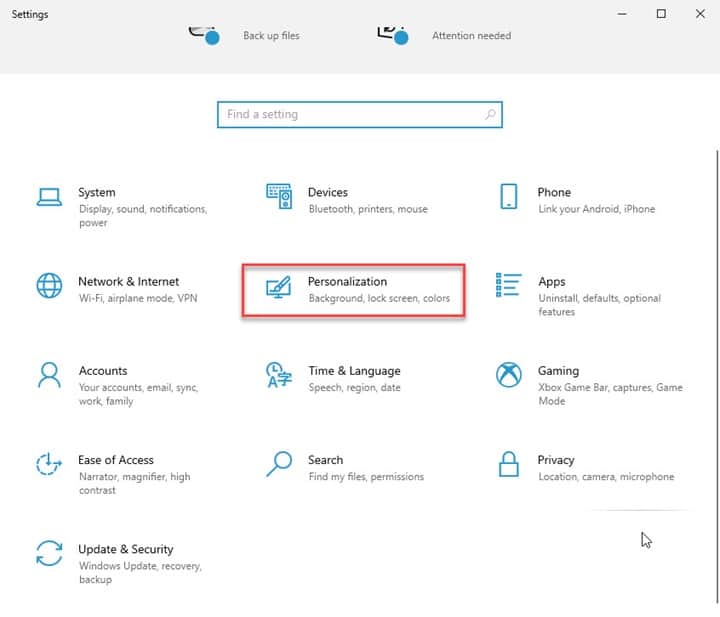
Check the settings so that it is properly configured. For checking the settings, go to Start and right click on it. Now this will open the Control Panel.
From the given options, select Settings and then choose Personalization. Next proceed to make necessary changes to the screen saver.
When you are in the Screen Saver Settings window, select the screen saver you want to use and then go for customization.
Make sure to set the time before the screen saver appears. After you have made the necessary configuration, exit the window.
Fix 2: Clean Mouse Pad And Sensor
When you are having optical mice, sometimes the mouse sensor may accumulate dust to them.
Never forget to check the lens also. In case they are dirty, they will detect improper inputs and then you will face screensaver not working on Windows 10 like problems.
In order to clean those, you can use some paper napkins or cotton swab with some screen cleaner. Remember to be gentle while cleaning.
Another thing you need to keep clean is your mouse pad. In case you find it too dusty, you can choose to replace it with a fresh one otherwise it can also affect your sensor.
Fix 3: Reset Power Saving Settings
If your power saving settings are somehow corrupted, then you may have problem with your screen saver.
Your screen saver is related to your power saving settings. Change the Power Management settings to the default settings. This may probably solve your problem.
Here I am describing a process to do so. Follow the steps:
Step 1: In the search bar enter Power and then proceed to choose the power plan.
Step 2: Here you will get to see your current power plan.
Step 3: Move on to Change Advanced Power Settings and choose the Reset plans to the default settings.
Now, you will get the settings to the default settings and this will probably solve your problem.
Fix 4: Check That Screensaver Is Enabled
When you cannot find the screensaver for a much longer time, make sure that the screen saver is activated.
Sometimes it gets deactivated and you need to check that and activate it.
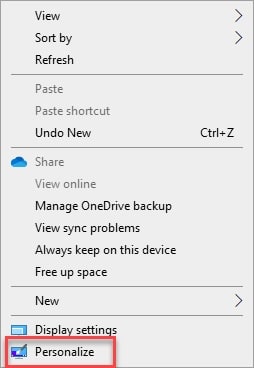
Step 1: Click right on the desktop and select Personalize. Then choose Lock screen and then move on to the settings.
Step 2: Choose a screen saver from the list and set the time. Now proceed to save the settings.
Fix 5: Use Power Troubleshooter
You can use the Windows 10 trouble-shooter to deal with the problem in your system. It will resolve the problem with your screensaver also. Follow the process described below :
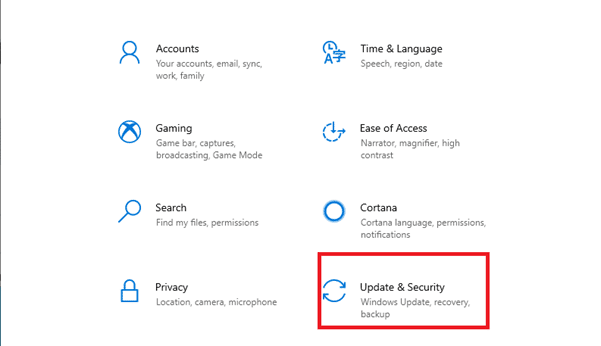
Step 1: Open your Settings and select Update & Security. Then choose the Troubleshooting option. Now find the Power button and then proceed to run trouble-shooter.
Step 2: Allow the process to get accomplished and by the time you need to follow the prompts provided on screen. After that, restart your device.
Fix 6: Remove Any Problematic Device
Sometimes the third-party software mainly the game controllers like X Box, Razor, etc. may create a lot of problems in the system.
In this case, also, you may try to remove the problem creating software and check whether this can provide any solution to the problem.
You can unplug each device and then plug in one by one and check which device is creating the screensaver not working windows 10 issue.
This way you can easily identify the problem creating device and remove it.
Fix 7: Update Or Reinstall The Problematic Driver
Sometimes the driver installation may get interrupted and, in this case, you will be facing the Win 10 screensaver not working problem.
This suggests that the problem creating device is having problems functioning.
To solve the problem, I would recommend you force Windows for reinstallation of the driver. You can go for updating or uninstallation.
Here I am describing you the procedure for updating or reinstalling the problematic driver with the help of the Device Manager.
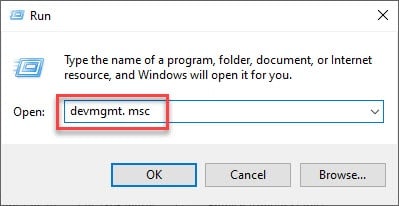
Step 1: First of all, open Run by holding the Windows key and pressing the R button. Now enter devmgmt.msc in the given box and press the Enter button.
Step 2: This will lead you to the Device Manager for further assistance.
When you get into the Device Manager, identify the device and right-click on it that is generating the issue and select Update Device from the displayed menu.
Step 3: Now, after right-clicking on the device, select choose Install Driver.
Now choose to search automatically for updating the driver from the next screen. This will help you search for a new driver signature automatically.
Step 4: After finding the latest driver version, you are required to follow the instructions given on screen for installing it.
After you finish the installation, restart your computer.
In case it cannot find the recent driver version, let us see how to compel Windows for reinstalling the driver.
Step 5: When you right-click on the problematic device, from the displayed menu choose Uninstall Device. Now choose Uninstall for completing the uninstall procedure.
After installation, give your Computer a fresh restart and this will allow the Operating System to complete the installation process for the missing driver.
Fix 8: Update Your Windows
Sometimes immediately after upgrading to Windows 10 version from an older one, you may encounter the win 10 screensaver not working as Windows may not have finished installing the pending device drivers.
Updating windows is required to address many problems in the System.
You can perform this task quite easily from your Updates and Security panel. Follow the below-given steps to do it:
Step 1: Go to Settings and go to Update & Security.
Step 2: Now choose Windows Update and select Check For Updates. When you locate any update complete the procedure and restart your system.
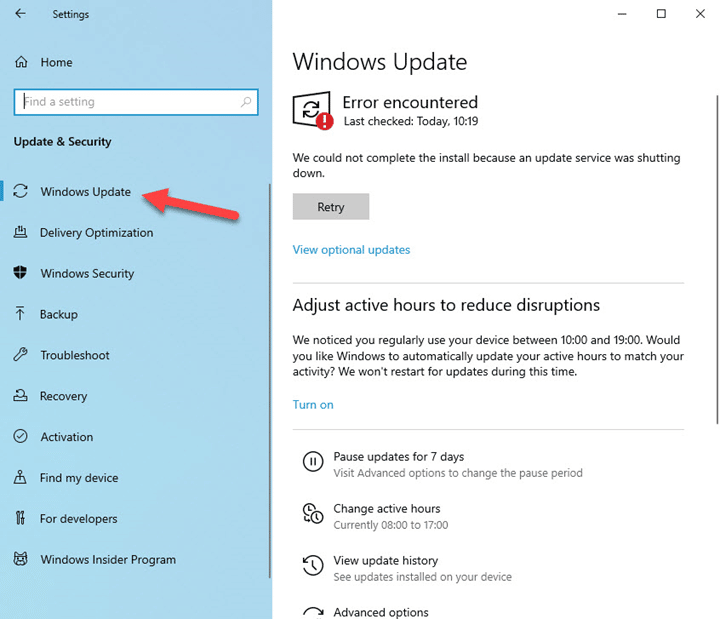
After you have rebooted the windows check whether it has made any improvement.
Many users have reported this process has solved their problem immediately. So, before you try any other remedy, you can give this a try.
Fix 9: Run A SFC and DISM Scan
When your screensaver is not working Windows 10, some corruption in the system files may create the problem and once you scan it you will be able to fix the problem.
You can take the help of the Command Prompt and by using the SFC and DISM utility, you can fix the problem.
To execute the process, I am describing the steps below. Please follow these steps to commence the procedure successfully:
Step 1: First of all, run Command Prompt as an administrator. Type Control Panel in the Search bar. Right-click on the option and select Run as Administrator.
Step 2: Now enter DISM.exe /online /cleanup-image /restorehealth and then hit the Enter button.
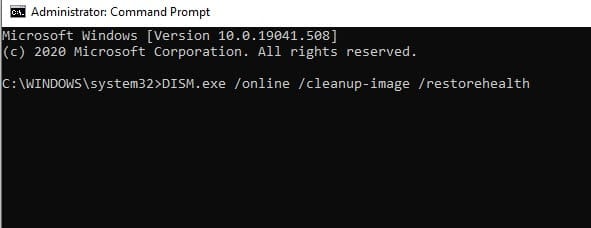
Step 3: In Command Prompt, type sfc /scannow, and hit the Enter Key.
Wait till the scan gets completed. It may take thirty minutes to accomplish the entire process.
Step 4: After finishing the scan, give your Windows a fresh restart and check whether the step has repaired the corrupted files.
Wrapping Up
So, I hope by now, you can find out the best possible way to solve the Windows 10 screensaver not working problem from the given article.
If you still have queries related to the recording software, please communicate with us in the comments section provided below.
Feel free to shoot us a mail with your ideas or suggestions. We always look forward to hearing back from you.
