As a type of portable storage device, USB stores various types of data for our learning and work, including documents, images, audio, and video files. It plays a crucial role in data backup, transfer, and sharing. However, what if important files are accidentally deleted from the USB drive? The official method suggests using CMD for free recovery. Therefore, this article will introduce two common commands to help you out of trouble. If that doesn’t work, don’t worry! We also introduce a powerful data recovery tool at the end of the article. To learn more, keep reading!
What is Command Prompt (CMD) in Windows?
On a Windows computer, CMD (Command Prompt) is a powerful command-line tool. It comes built-in with Windows and doesn’t require any downloads or installations. Through CMD, users can execute various commands to perform different operations, including copying, moving, deleting files, and changing file attributes.
From a data recovery perspective, it provides a quick and effective way to recover lost data without relying on third-party software or paid services. By inputting text commands, users can retrieve important files in a short amount of time. Although CMD may have a learning curve for beginners, once you grasp the basics, you’ll be able to leverage CMD to address various data recovery issues effectively.
How to Recover Files from USB Using CMD?
Since each command has specific syntax and a set of parameters to control its behavior, recovering files from a USB drive requires using the corresponding commands. Below, we will introduce two different commands, each suitable for different situations. Please choose according to your specific issue.
Method 1. Use Attrib Command
The Attrib (Attribute) command is a command-line tool in the Windows operating system. It allows users to modify the attributes of files or directories, such as read-only, hidden, system, and archive attributes. Therefore, if you find that files suddenly disappear in USB, it may be due to a virus infection or other reasons causing them to be hidden. In this case, you can use the Attrib command to recover the files.
Here is how to recover deleted files from USB using Attrib Command:
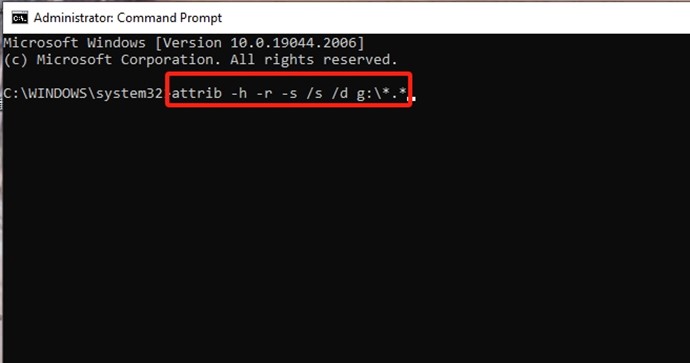
Step 1. Insert your USB into the computer. Then, find the magnifying glass icon on the bottom taskbar of the computer. Enter “cmd” in the search bar and click to enter.
Step 2. Then, you will enter the command window. Enter “attrib -h -r -s /s /d g:\*.*” (Replace “g” with the drive letter where you lost files.)
Step 3. Then, wait for a moment, and you will regain access to your lost files.
Method 2. Use CHKDSK Command
CHKDSK is another command-line tool in the Windows operating system, which stands for “Check Disk”. Its primary function is to detect and repair disk errors, bad sectors, and file system errors on disk drives. When a hard disk drive is damaged or experiences errors, files may become lost or inaccessible.
By executing the CHKDSK command, the system can scan the hard disk drive, and detect, and repair errors in the file system, including lost files, damaged file structures, and other file system issues. Therefore, if you experience USB file loss due to issues like file system corruption, you can try to recover the files from the USB drive using the CHKDSK command.
Step 1. Connect your USB to the computer. Then, find the magnifying glass icon on the bottom taskbar of the computer. Enter “cmd” in the search bar and click to enter.
Step 2. Then, you will enter the command window. Enter “chkdsk i: /r” (Replace “i” with the drive letter where you lost files) and wait for the command to finish.

Recover Data from USB via Data Recovery Tool
As you can see, the above two methods using CMD to recover files have certain limitations, especially if your files were not hidden or lost due to file system errors, but rather accidentally deleted. In such cases, you can try using a third-party recovery tool – FonePaw USB Data Recovery.
FonePaw USB Data Recovery is a professional data recovery software designed to recover lost hard drive data. It is capable of handling a wide range of scenarios, such as accidental deletion, formatting, virus infection, system crashes, etc. It can recover over a thousand file types, including videos, images, audio files, Office documents, and more while maintaining the original quality.
The software supports multiple file systems, including NTFS, exFAT, FAT16/FAT32, APFS, etc. It allows free scanning and preview of all contents on your USB drive, and you can choose the recovery location independently to avoid secondary data loss. Its operation is simple and boasts a high success rate in recovery. This enables you to easily recover files from USB drive at home without the need to go out or possess professional knowledge.
Here’s how to recover USB data with FonePaw USB Data Recovery:
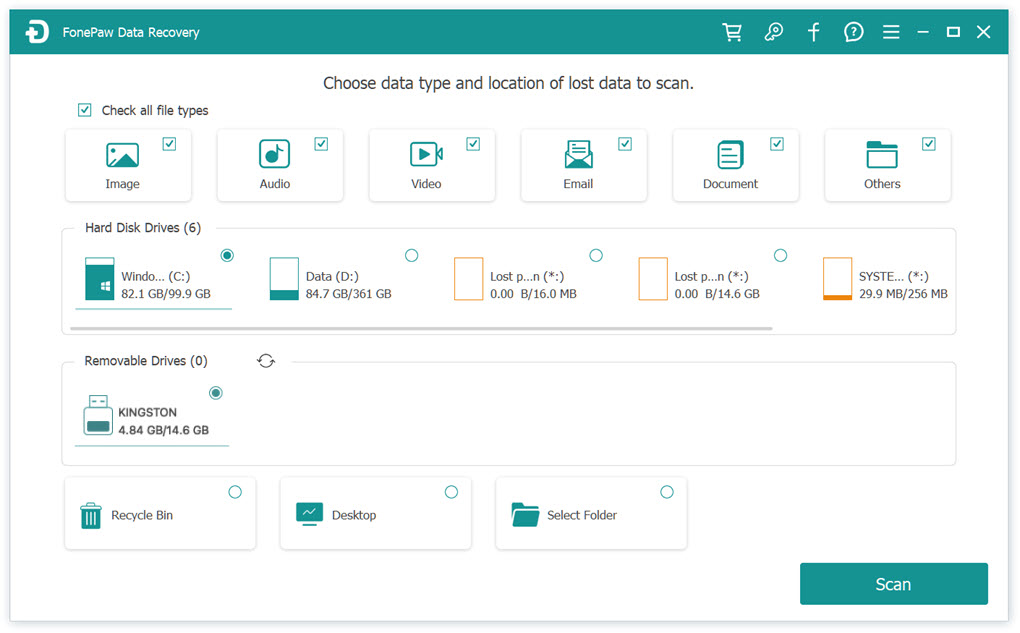
- After installing the software, run it and plug in your USB to the computer.
- On the main interface of the software, select the types of files you want to recover in the first row, then choose your USB flash drive under the “Removable Drives” category. Click “Scan”.
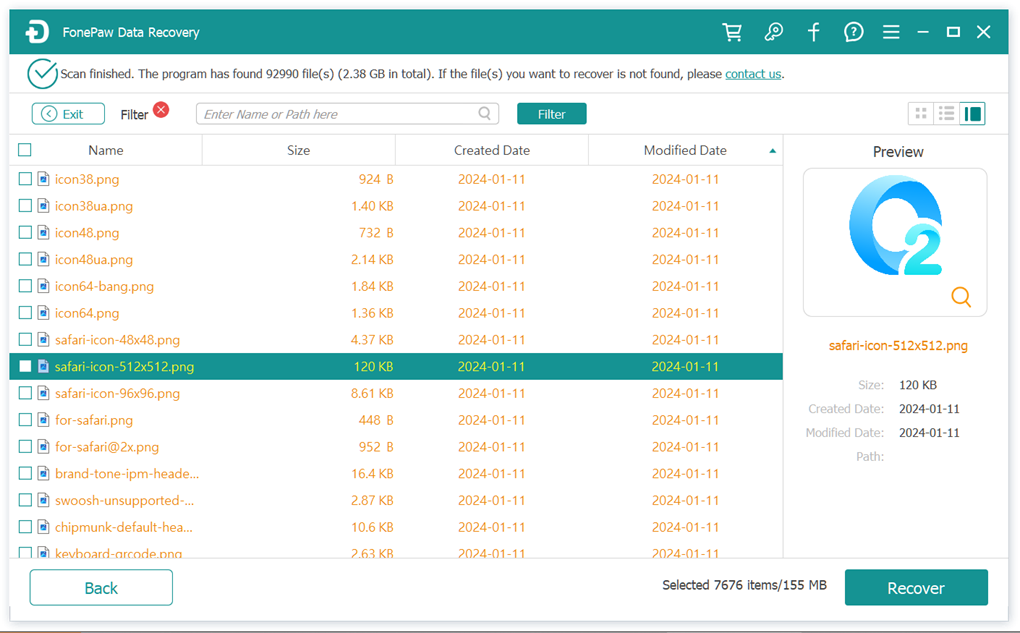
3. The software will scan your USB drive, and all files will be displayed on the page. Once you locate the files you want to recover, click the “Recover” button to start recovering USB data.
Conclusion
CMD is a built-in free tool for Windows computers. Therefore, if you lose files on your USB drive, you can consider using the Attrib Command and CHKDSK Command to attempt file recovery. However, both of these methods have certain limitations.
If you find them unsuitable, we highly recommend using FonePaw USB Data Recovery instead. This software supports various data loss scenarios and can recover over a thousand file types. It is compatible with various devices, such as computers, SSD/HDD drives, memory cards, USB flash drives, cameras, and more. If you’re eager to retrieve files from your USB drive, give this software a try as its scanning and preview features are both free of charge.