 With PC gaming steadily on the rise, Microsoft introduced a new feature with Windows 10 called Windows Game Bar. Originally part of the Xbox app, the Game Bar is also present on the Xbox one and provides a host of functions. See below the methods to disable Windows Game Bar easily.
Purpose And Negative Impact Of The Game Bar
The Game Bar is an easily accessible tool. When running a game, press Windows key + G on your keyboard or press the Xbox button on your gamepad to bring up the Game Bar.
The Game Bar is an efficient tool and provides many additional important features. But not everybody needs it.
We have multiple reports on forums that it also clashes with other streaming services like steam or Twitch.
It does not noticeably hamper system performance, but it does come with some additional features that hog the system resources and affect the FPS you can get. If you face issues like FPS drop or game lags, read here to find how to disable the Windows Game Bar and its features.
# Method 1 (Using SETTINGS app)
- open the settings app from the start menu. Click on gaming.
- Select the Game Bar
- Set the “Record game clips, screenshots, and broadcast using Game Bar” to Off.
- Uncheck the “Open Game Bar using this button on a controller:

5.Switch to Game DVR menu.
6.Set the “Record in the background while I’m playing a game” to Off.
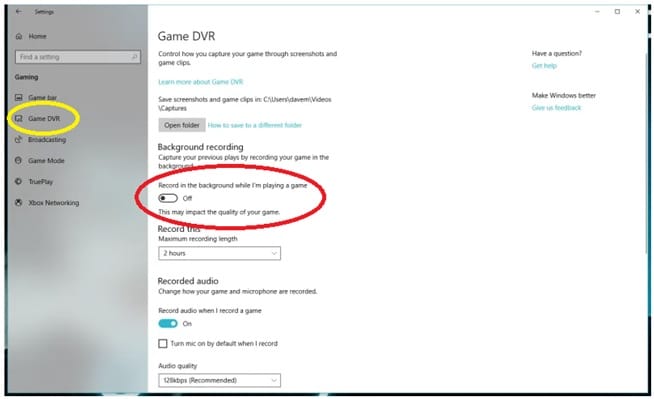
This will turn off the Game Bar and Game DVR, helping you save some precious resources that it takes up.
There are other methods to turn off the Game Bar too. Here are alternative methods.
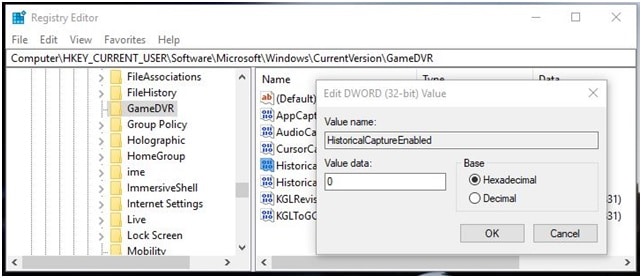
# Method 2 (Using Registry Editor)
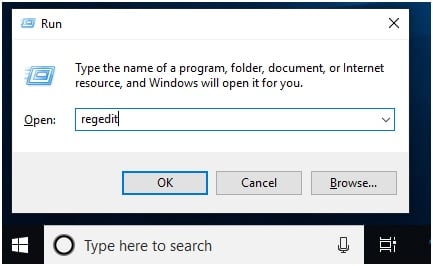
- Open Run Command by pressing Win + R.
- Type regedit to open Registry Editor
3.Search and open this pathway: HKEY_CURRENT_USER\Software\Microsoft\Windows\CurrentVersion\GameDVR
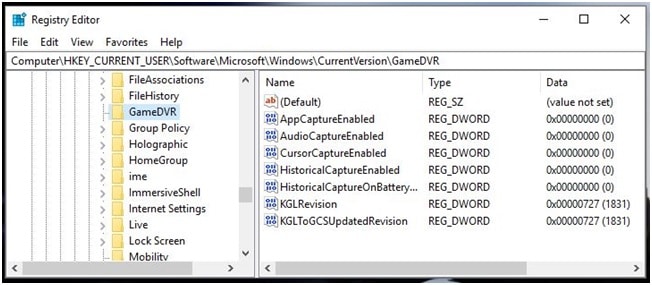
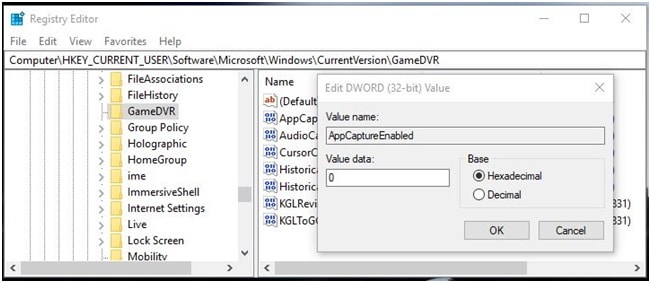
4.Double click on DWORD entry AppCaptureEnabled on the right pane. Set its value data to 0 to turn off Game Bar.
5.Double click on DWORD entry HistoricalCaptureEnabled and change the value data to 0 to turn off the Xbox Game DVR.
Another method is to use the Local Group Policy Editor. Here the method is given.
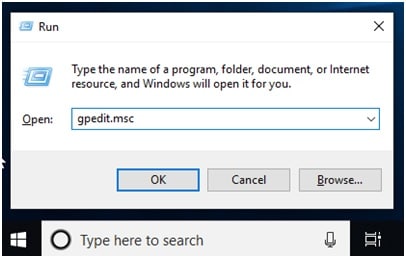
# Method 3 (Using Local Group Policy Editor)
- Open Run Command by pressing Win + R.
- Type msc and hit enter to open the Local Group Policy Editor.
3.Search and open this pathway: Computer Configuration\Administrative Templates\Windows Components\Windows Game Recording and Broadcasting.
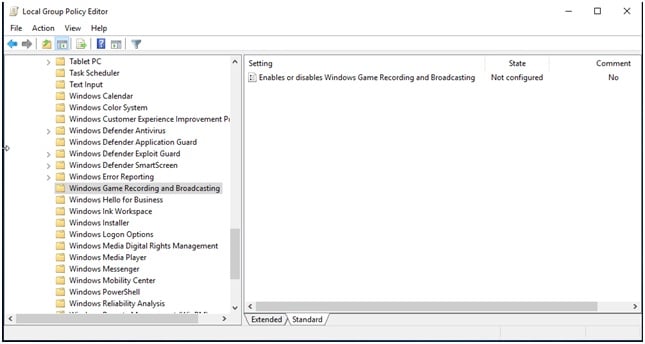
4.Double click the on Windows Game Recording and Broadcasting.
5.Select Disabled and click OK
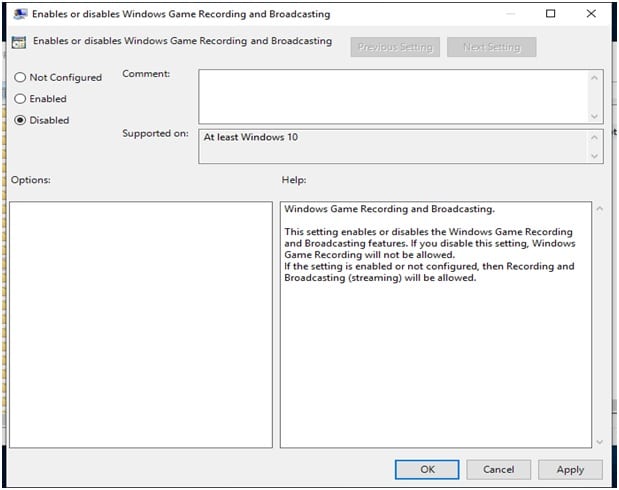
6.Restart your computer for the changes to take effect.
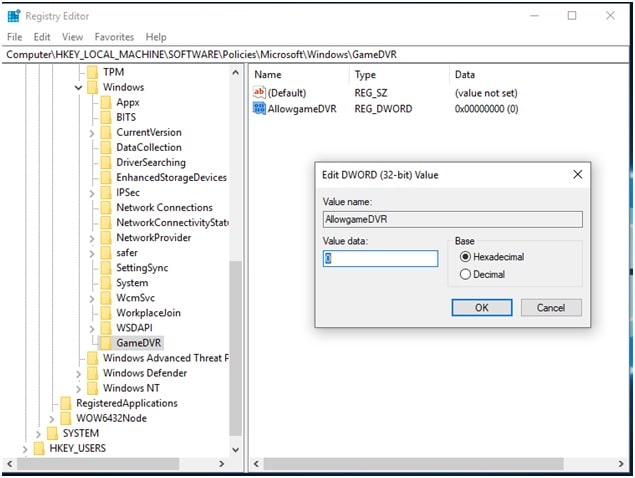
If you have Windows 10 home edition, Local Group Editor is not available. So here is another method to make the same changes to the Group Policy Editor
- Open Registry Editor from method 2 above.
- Go to HKEY_LOCAL_MACHINE\SOFTWARE\Policies\Microsoft\Windows
- Create a subkey named GameDVR
- Create a DWORD (32 bit) entry called AllowgameDVR and set value data to 0.
Disabling The Xbox Game Monitoring
As the name suggests, Xbox game monitoring “monitors” what game you have been playing. It runs as a LocalSystem on its own process of xbgmsvc.exe. you need to disable this process from the registry as well. Remember to backup your registry files before making any changes to the registry, in case something goes wrong.
Follow these steps very closely to disable Xbox game monitoring.
- Open Registry Editor by following the steps given above.
- Double click HKEY_LOCAL_MACHINE
- Navigate to and double click SYSTEM
- Double click CurrentControlSet and select Services
- Scroll down to find and select
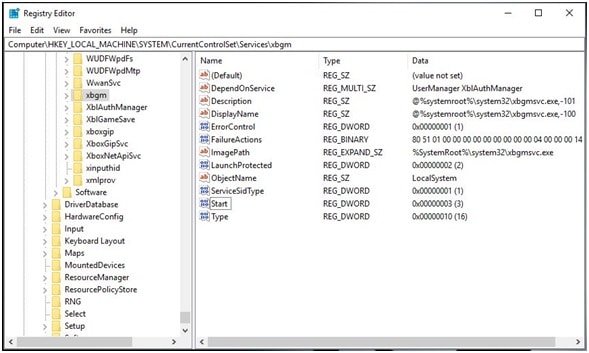
6. On the right pane, locate Start REG_DWORD and right click to open Modify
7. See the default value is set to 3, change it to 4 and click OK.

You have successfully disabled Xbox Game Monitoring. If any problems occur or to change back, repeat the steps and change the value back to 4 in step 7.
Conclusion
So there you have it. With these 4 given methods, you now know how to disable Windows Game Bar and Xbox GameDVR in Windows 10. Did you find these steps helpful? Comment down below if you use these methods to disable Windows Game Bar.
I used the 2nd half of Method #3 from “If you have Windows 10 home edition, …” on down.
xbgm didn’t exist so I created it and then created Start and set it to 4.
After re-boot, no background process of Xbox Game Bar.
Thanks for the tip!