The file system of a drive is probably one of the last things a user checks, but they are very important for the type of data that you want to handle using the storage system. Fat32 file system is usually used in external storage devices like hard disks and flash drives.
On Windows 10 devices, the newer NTFS file system is used, which comes with increased reliability and security features. If you have an older computer with a fat32 formatted hard drive, here I shall discuss how to convert FAT32 to NTFS easily.
Why Convert Fat To NTFS?
Before learning how to convert file systems, first, you must understand why each find system is important. Fat 32 formatted hard disks can have a maximum partition size of 32GB without any compression standards. It can also handle file sizes up to 4GB only. This is the reason why you may notice external flash drives of smaller capacities formatted 2 fat 32 file system.
The newer NTFS file system can handle partition sizes of up to 2TB while handling file size is up to 16 TB. There are also local and network security features along with auto repair for fault tolerance. This is the ideal file system for modern-day hard drives with high storage capacities.
How To Convert FAT32 To NTFS In Windows 10?
Windows 10 allows native file system conversion. If you recently upgraded to Windows 10 on an older system, or have a drive formatted to fat 32 file system, here is how you can change FAT32 to NTFS easily.
Before You Convert:
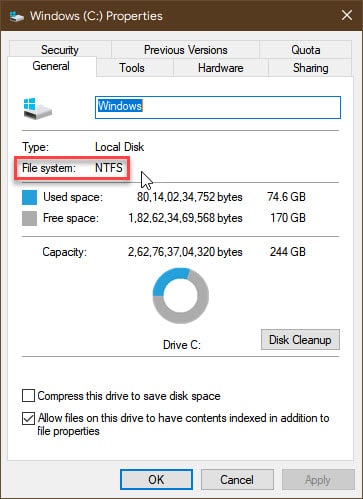
First, to confirm the file system of a storage device, go to the Properties dialog for the same which is accessible from the right-click context menu, and check the File system entry under the General tab.
Method 1: Using The Command Prompt
If you have a lot of files on your hard disk and do not have enough storage to take a backup of these files, you can use the command line interpreter to change the file systems on your computer. For this you will need an elevated command prompt, and here are the steps you need to follow:
- Open a Run dialogue using the shortcut Win + R.
- Now, type cmd and press Ctrl + Shift + Enter to launch the command prompt with administrator privileges.
- Here use the following command to convert your FAT formatted storage device to NTFS:
convert <DRIVE_LETTER>: /FS:NTFS
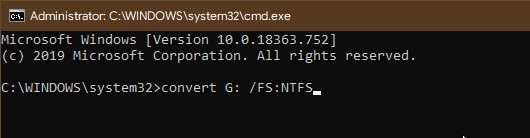
Note: Replace <DRIVE_LETTER> with the drive letter associated with the drive that you wish to reformat.
The conversion process should begin immediately. The time taken will vary mostly on the files present on the drive, as the files are preserved upon conversion. However, it is still recommended to take a backup of the important files in case Windows fails to preserve the files.
Method 2: From The Format Option
If there are no files on your storage device, you can use the Format option from the file explorer. This method will not preserve any files, so make sure to take a backup if there are any important files on the drive. Follow these steps for the same:
- Connect your storage device to your computer and open the drive in File Explorer.
- Right-click on any space in the File Explorer when your drive is open in the window.
- Select Format from the context menu.
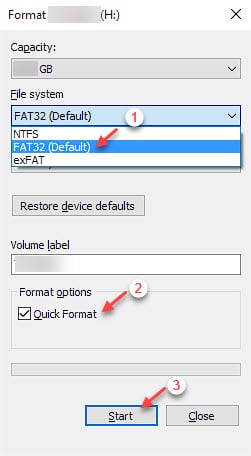
- Here change the file system by using the drop-down menu in the Format dialog that opens.
- Also, make sure to check the box next to Quick Format.
- Click on the Start button to begin formatting your drive.
Once the formatting finishes, the drive is now formatted to the NTFS file system and you can use it to store and transfer your files.
Method 3: Use Third-Party Partition Management Software
Another method that you can use involves using 3rd party partition management software. There are many such popular applications out there, and we have also reviewed some popular ones. If you are interested in investing in one such software, make sure to read the reviews before making your purchase.
Minitool partitioning Wizard Review
AOMEI Partition Assistant review
Wrapping Up
So, there you have it. Now you know how to convert FAT32 to NTFS using the methods provided above. Comment below if you found this useful, and to discuss further the same.