The processor core works as an independent processing unit. Each core consists of processing hardware & cache.
The system bus and the shared memory of the chip connect this to your Central processing unit.
One core equivalent to the entire CPU, and when we talk about multi-core processors, it is like assembling many CPUs.
This process helps you to segregate your huge computing tasks amongst the cores.
This in turn helps you to finish the work faster and efficiently without dumping the entire work on a single core.
So, when the CPU is not using all cores, here is a perfect guide to resolve the issue.
Understanding Why CPU Is Not Using All Cores
The technique of using all the cores by the CPU is dependent upon your operating system you’re running as well as the applications you’re using.
Not all OS is capable of using multiple cores and so, you do not get any advantage of using so many cores at a time.
But most of the modern operating systems as well as the resource-consuming programs like Adobe Premiere enjoy the benefit of extra added cores making your work quick and efficient.
So, when the CPU is not using all cores, you need to understand that the problem is with your operating system and applications.
Role Of Task Manager To Sort Out CPU Not Using All Cores Issue
You can take the help of your Task Manager for monitoring the number of cores that are present on your CPU.
But some users faced problems to perform the task with their task manager and they might get wrong results for the thread and core count.
This problem is typically associated with the lower-end PCs, that have dual-cores.
It might not be possible for everyone to upgrade their machine constantly, so, here is a perfect guide to demonstrate how to solve the CPU not using all cores issue.
Process 1: Check That All The Cores Are Enabled
Before you proceed to other solutions for finding an answer to how to enable all cores windows 10, make sure you check that all the CPU cores are enabled.
The below-mentioned procedure will enable you to get the exact view of the number of processors when you are using The Task Manager or another monitoring system.
Here I am describing the process. Follow the steps meticulously:
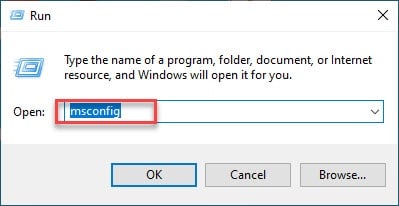
Open the Run dialog box by pressing the Windows key and R hotkey.
Now when the dialog box gets opened, enter MSConfig in the box as I have shown in the picture below:
When the next window opens, enter the Boot tab, and select the Advanced Settings options. Follow the way I have guided in the picture.
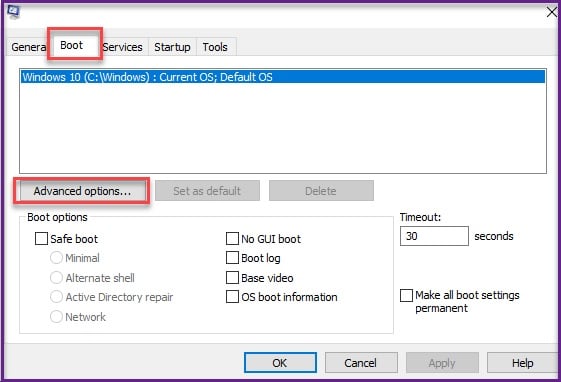
Find out the Number of processors and see that the checkbox is enabled or disabled. In case it is enabled, uncheck the option.
This way your system is going to utilize all the processors.
Now give your system a fresh restart. Go to your Task Manager.
You can also choose another monitoring program for viewing the number of available cores. Now you will be able to get an exact view of the numbers.
By default setting and designing, you can use this system setting option for reducing the number of cores for your CPU. Your system always targets to use most of the processors.
In case you get to see that the system setting is modified to less than the default value, make sure another software may be responsible for this sort of tampering.
Process 2: Rely on A Separate Monitoring Tool
When you are throttled with how to activate all cores in Windows 10, make sure that the problem may have been generated because of the display bug from your Task Manager.
For resolving the issue instantly, give your system a fresh restart.
In case you find inconsistency in the number of cores and threads, try another monitoring tool option for your Central Processing Unit.
You have several available options nowadays to choose from. There are a wide variety of software tools suitable for monitoring the activities of your CPU.
Many users have reported that they found them better than that of the age-old Task Manager!
Besides monitoring the actual number of cores and threads, they can give you the temperature reading, checking processing speeds, and are equipped with many more performances.
Process 3: Get A New CPU
In case you are using a much older CPU and still could not find an answer to how to activate all cores, it’s time to replace your old CPU and get a new one.
This may be the reason why you see fewer cores than your CPU is using.
In case you are searching for a CPU upgrade, check a fresh CPU to do the task for you.
Hope your new system is going to make the task easy for you.
Relate to: 15 Signs It is Time to Buy a New Computer!
Closing Words
So, I hope by now, you can find out a suitable solution if got annoyed when you encounter the CPU not using all cores problem.
If you still have queries related to this issue or any other folder, please communicate with us in the comments section provided below.
Feel free to shoot us a mail with your ideas or suggestions. We always look forward to hearing back from you.
