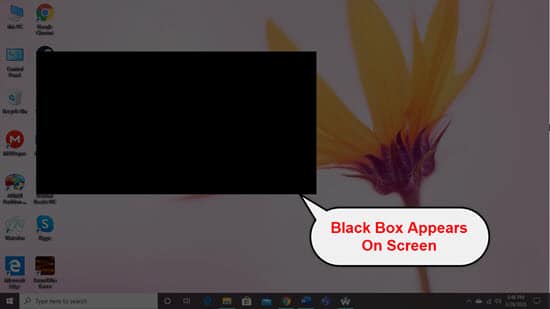
Many users reported an unusual error in Windows 10. A black box keeps flashing on screen which looks like an error message box without any text. It might be very disgusting while working on a computer or typing text and the black screen flashes. It appears repeatedly after a specific time duration.
A few possible reasons and solutions are discussed below to stop the black squares flashing on the screen. If you are one of the sufferers, keep on reading this article to get a clear idea about the strange error as well as the solutions for the same.
How To Stop The Black Box Keeps Flashing On Screen?
‘Why does a black box appear on my computer screen?’
Well, you might have the black boxes on the computer screen due to several reasons such as dual graphics cards enabled, damaged Windows files, wrong brightness settings or outdated display drivers. There are few solutions listed below how you can stop if a black box keeps flashing on the screen. Apply these methods one by one to know which one works better for you.
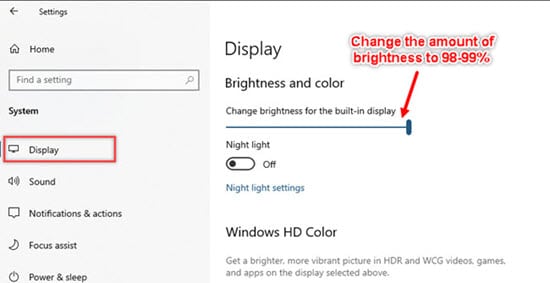
Solution 1: Lower The Brightness Settings
According to user reports, the black box might appear on laptops if the brightness settings are not well configured. When your device is already plugged in, setting display brightness to 100% may cause the issue. You should check if the brightness settings are wrong or there is a need for changing the settings. Follow the steps below to change the settings on your laptop quickly:
- Go to the Power options and locate the current power plan.
- Click on the Change plan settings option.
- Now locate the display brightness settings and change the brightness amount to 98 or 99% (Lower than 100%) when the laptop is plugged in.
- Save the changes and restart your laptop.
Now check if the problem still continues.
Solution 2: Connect Monitor With HDMI Or Display Port
Nowadays, most of the monitors prefer HDMI or display port as the main port instead of VGA ports. Connecting with the HDMI or display port gives you the best display quality and viewing experience. If you have a graphics card that supports HDMI connections, and still you are using old VGA ports, you should switch to HDMI or display port.
Lots of users reported that connecting the monitor with HDMI or the display port resolved the black screen error. So, you should positively try this one to see if it also works for you.
Solution 3: Check For Display Adapter Update
Sometimes a pending display adapter update might cause the black squares flashing on the screen. Sometimes your display adapter doesn’t get updates automatically, you should check and update the driver manually.
If you want to know more about the device driver update, read how to update the device driver easily here.
If you find the black boxes on the computer screen still persist after updating the display driver, you should apply the next solutions below.
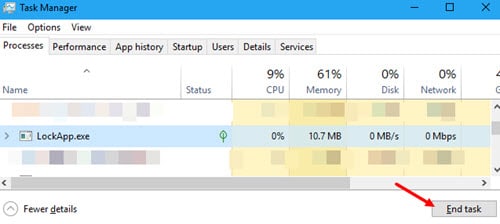
Solution 4: Check The Lock Screen App
The lock Screen app sometimes might cause the black box to appear on the screen. You should reset the Lock Screen service to ensure that this solution works or not. Follow the steps below to do the Lock Screen reset:
- Press Win + R to open the Run dialog box.
- Type taskmgr and press the Enter key from the keyboard.
- It will open the task manager window. Now locate the LockAppHost.exe and end the task.
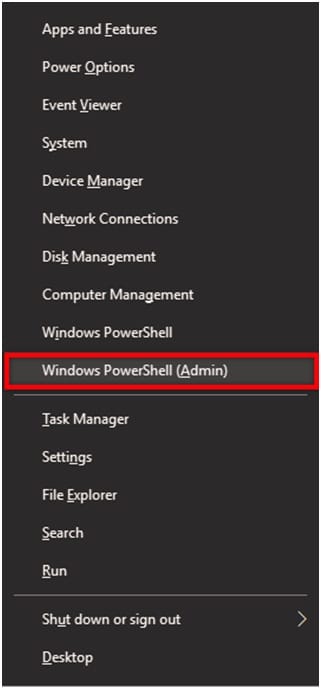
- Go to the Start icon and right-click on it.
- Select the Windows PowerShell (Admin) option and click on the Yes button to confirm.
- Now type the commands and press Enter button after each command:
-
- PowerShell -ExecutionPolicy Unrestricted
- Get-AppXPackage -AllUsers | Foreach {Add-AppxPackage -DisableDevelopmentMode -Register
“$($_.InstallLocation)AppXManifest.xml”}
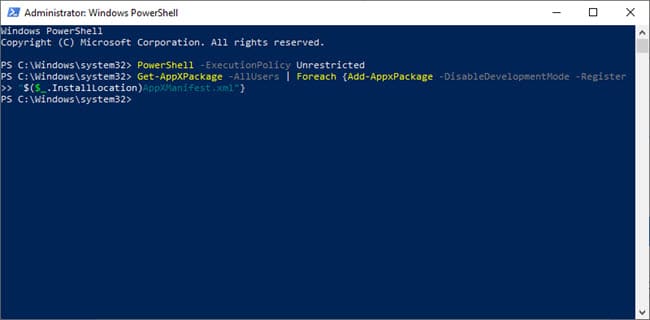
- Your Lock Screen app is now back to default.
Solution 5: Disable Dual Graphics Card
If you have the onboard graphics and the dedicated graphics card running together on your PC, there might happen some clash between them. You should simply disable the on-board graphics card if both of them are enabled.
You should perform this process by enabling the safe mode to avoid any potential problem. Follow the steps provided below to disable the on-board graphics:
- Press the Shift key from keyboard and restart your computer holding the shift key down.
- It will open the Advanced Startup window. Click on the Troubleshoot option.
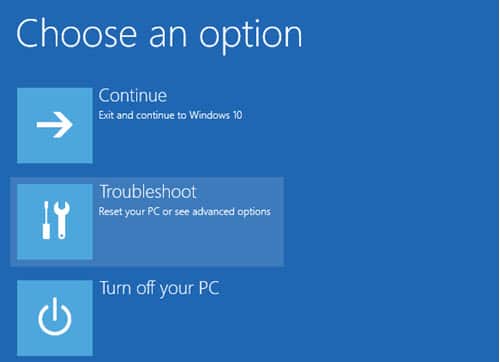
- On the next window, click on the Advanced options and select the Startup Settings option.
- Now click on the Restart button.
- When the next window appears with several startup options, press F5 on your keyboard to choose Enable Safe Mode with Networking option.
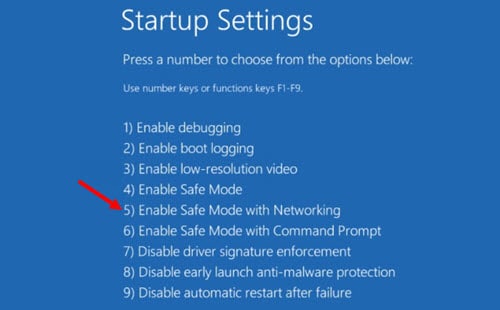
- Your computer will boot up in safe mode with network access enabled.
- Press Win + R to open the Run and type devmgmt.msc in the search box.
- Hit the Enter key from the keyboard and it will open the Device Manager window.
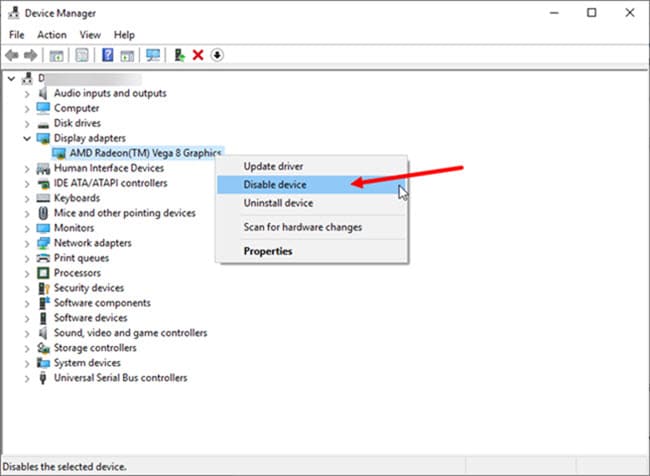
- Now navigate to your onboard graphics by expanding the Display adapter section and right-click on it.
- Choose the Disable option to disable the onboard graphics.
- Finally, restart your computer.
After a restart, check whether the problem is resolved or still the black box keeps flashing on the screen.
Solution 6: Repair Corrupted Windows Files
If you have some damaged Windows files present in your system, it can cause you to experience the black box issue repeatedly. You should try scanning and finding out those damaged files to fix them. To Scan for those files and fix them, you need to follow the procedure discussed below:
- Press the Win + R key to open the Run dialog box.
- Type cmd in the search box and press the CTRL + Shift + Enter key from the keyboard to run the Command Prompt as Admin.
- Now copy the following command and paste it into the command prompt:
DISM.exe /Online /Cleanup-image /Restorehealth
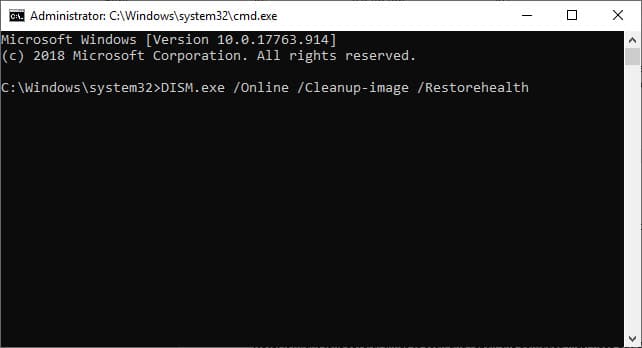
- Hit the Enter key to run the command.
- DISM will scan for damaged files automatically and find out possible solutions.
- After DISM finishes its scan, restart your computer.
Note: It might take a few minutes to scan and repair the damaged files. Keep patience and do not end the process mid-way. Ending the process or restarting your computer while the process is running might cause harm to your computer.
When the scan and repair are completed, after restarting your computer, check if the black box error appears again or not.
Solution 7: Run The SFC Scan
If the solutions stated above did not work for you, you may try to run the SFC scan which is a built-in element of Windows. SFC scan looks for various system issues and indicates to you where the problem is located. This process doesn’t repair the issues, but it might help you to resolve the black box issue.
To know the process of the SFC scan, click on how to run the SFC scan.
After applying the steps, you need to restart your computer and wait to ensure that if the black boxes on the computer screen still appear. If it doesn’t appear for a long time, then the error is resolved.
Solution 8: Update BIOS
The black squares flashing on screen may appear if your graphics card driver and BIOS version do not match with each other. In that case, you should update the BIOS to resolve the issue. BIOS update is not that much easy. So, be careful while changing settings in BIOS. Any wrong input can damage your computer permanently.
Usually, BIOS updates are automatic. But you may also check for the update manually by visiting your motherboard manufacturer website. To check your current BIOS version, follow the steps below:
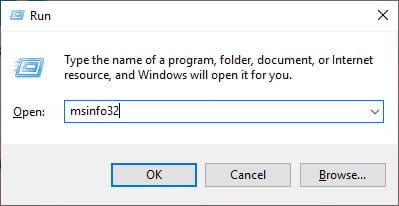
- Press Win + R to open the Run dialog box.
- Type msinfo32 and press Enter key from keyboard to open the System Info window.
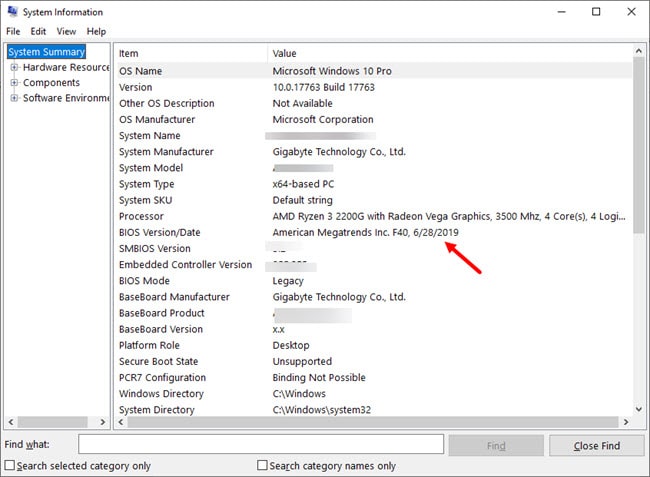
- In the System Info, locate the BIOS version/date section to know your current BIOS version.
- Now visit the manufacturer website of your motherboard and look for available updates for BIOS.
- If there is any available BIOS update for your motherboard, you should download and install it.
Updating your BIOS may help you to resolve the issue and by now, your problem should have fixed.
Conclusion
All the workable solutions are discussed above to help you to fix the error. If you found this article helpful, let us know by commenting below. Also, mention which of the provided solutions really worked for you. If still you are having the black box keeps flashing on screen, feel free to tell us here.
