When you create a fresh file, temporary files get generated and they temporarily retain the data.
So, these files need to be deleted else these will take up lots of unnecessary space and prevent your system to perform smooth.
These files unnecessarily take up lots of gigabytes from your system.
But sometimes it is not that easy to clean up these temporary files and you face Windows 10 won’t delete temporary files issue.
How To Solve Windows 10 Won’t Delete Temporary Files Issue?
You can remove the temporary files with the help of the in-built Disk Cleanup Tool, or you may manually choose to remove those unnecessary space consuming files.
Sometimes your pending windows updates may create issues and prevent you from deleting the files.
Besides, you can also choose to delete these files using the Safe Mode.
Let us now explore through this article some handy remedies to solve the Windows 10 won’t delete temporary files problem.
Solution 1: Manually Remove The Files
To solve the Windows 10 won’t delete temporary files problem you can choose to delete the files manually.
Here I am describing the process of how to do it. Follow the steps given below:
Step 1: Hold Windows key and then press R to open Run. Then in the dialog box, enter temp and then press OK.

Step 2: Now, hold the Ctrl key and press A. This will help you select all. Now press the Delete button.
Step 3: Open Run again select all and Delete. and then enter %temp% in the Run dialog box and then hit the OK button.
Step 4: Again, Delete. Open Run and enter prefetch and then press OK. Now, press Ctrl + A followed by Delete.
For permanently deleting the files, press the Shift and Delete keys together instead of pressing the Delete button.
This way the files will be permanently deleted and not sent to your recycle bin.
Solution 2: Try Disk Cleanup Tool
If you are throttled with temporary files won’t delete problem, try to clean the files with the help of your in-built Disk Cleanup application.
This will help you scan the drive that you select and give you the details of the files that are consuming lots of space.
You can easily choose the files to free up space and delete them temporarily.
Follow the detailed guideline mentioned below:
Step 1: Hold the Windows Key and press S. Now type disk in the box and from the given options, choose the Disk Cleanup option.
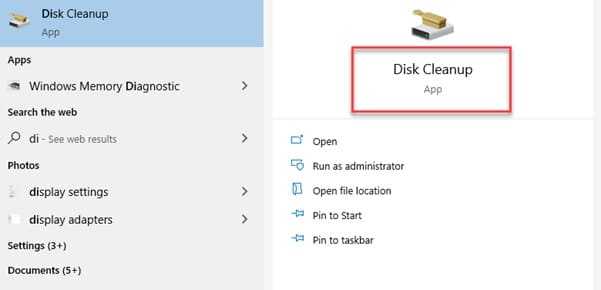
Step 2: Check whether the System drive is selected. It is by default your C drive. Then hit the Ok button.
Step 3: Now you will have to wait until the entire process gets completed.
Step 4: From there choose the files that you need to delete and then press the OK button.
For removing additional ones, make sure to press the Clean system files option.
After the process gets completed, temporary files will get removed, and clean up some space. As these files consume a huge space, after you remove them, the issue may get solved.
Solution 3: Remove The Files Using Command Prompt
When you cannot remove the temporary files, use Command prompt to remove them. Follow the process given below.
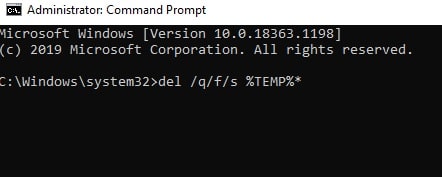
Step 1: Hold the Windows Key and press the X button. Now select elevated Command Prompt.
Step 2: Now type: del /q/f/s %TEMP%* in the given box and hit the Enter button for running the Command. Check whether this remedy has worked for you.
Solution 4: Remove The Contents From Software Distribution Directory
Many of the users took the help of this process to combat with the delete temporary files Windows 10 not working.
This directory stores the Windows Update files. It may create a problem while you wish to delete your temporary files.
Follow the process mentioned below:
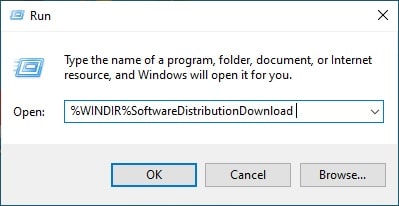
Step 1: Make sure you are not ongoing any update process. When there is no updating process going on, open the Run dialog box.
Step 2: Now type %WINDIR%SoftwareDistributionDownload in the box and hit the Enter button followed by OK.
Step 3: Next go for the selection of all the files available from the Download directory and proceed to remove everything.
Now check whether this process helped you to remove the temporary files.
Solution 5: Remove Any Problematic Software
Sometimes the third-party software may create a lot of problems in the system.
In this case, also, you may try to remove the problem creating software and check whether this can provide any solution to the problem.
Your antivirus software may give you another trouble. So, for the time being, you can remove the antivirus programs as well.
Solution 6: Check For Any Pending Updates
Updating windows is required to address many problems in the System along with the delete temporary files windows 10 not working issue.
You can perform this task quite easily from your Updates and Security panel. Follow the below-given steps to do it:
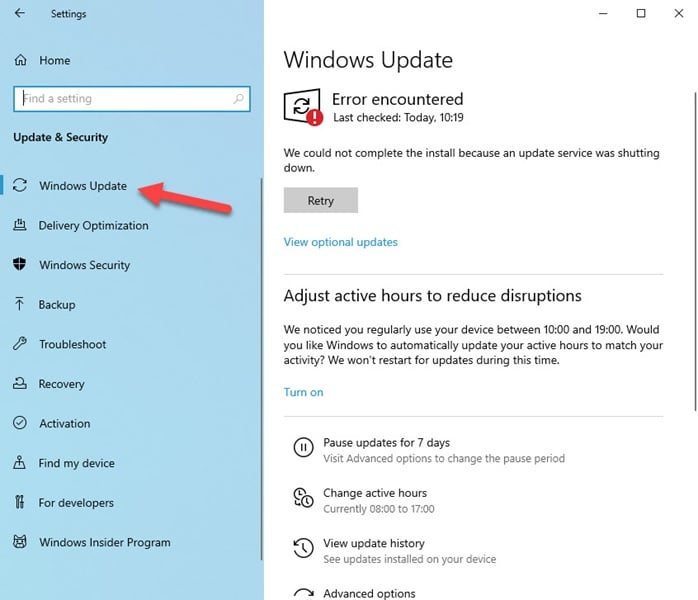
Step 1: First of all open your Settings and go to Update & Security.
Step 2: Now choose Windows Update and select Check For Updates. When you locate any update complete the procedure and restart your system.
After that reboot and check whether you can delete the temporary files now.
Many users have reported that after allowing the necessary updates they could easily handle the situation with the temporary files.
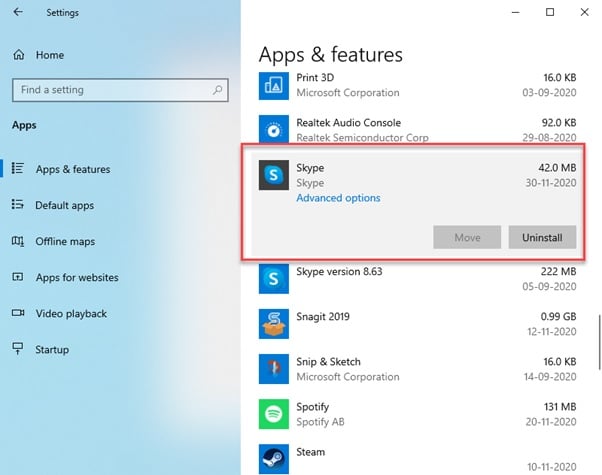
Solution 7: Uninstall Third-Party Software Like Spotify Or Skype
Some users have reported that third-party software like skype or Spotify may create problems in your system and prevent you from deleting temporary files.
In order to get a solution, remove this software from your system.
Step 1: Go to Settings and then move on to your Apps section.
Step 2: From the list, select Spotify and Skype and hit the Uninstall button.
Solution 8: Remove The Files Using Safe Mode
When you cannot remove the temporary files, try to use the Safe mode to delete them. Access Safe Mode and remove the temporary files from there.
Follow the instructions to commence the task.
Step 1: Got to start and press the power button. Now press the Shift key and select the restart option.
Step 2: Now, select Troubleshoot, and next move on to Advanced.
Step 3: Next choose Startup Settings and then press the Restart option.
Step 4: When your Computer gets starts, from the given options choose a version of the Safe Mode.
After you are in the Safe Mode, try deleting the temporary files and hope this will solve your Windows 10 temporary files won’t delete problem.
Read Also: Windows 10 Safe Mode: In depth Tutorial
Winding Up
So, I hope by now, you can find out the best possible way to solve the Windows 10 won’t delete temporary files problem from the given article.
If you still have queries related to the recording software, please communicate with us in the comments section provided below.
Feel free to shoot us a mail with your ideas or suggestions. We always look forward to hearing back from you.
All the tricks and methods are very useful. Thank you.
Very workable. Tank you very much Sanchita.