You must have heard of the new research that says that the blue light emitted by the displays in monitors and mobile phones is actually harmful to your health. This is proven to be true, and blue light emitted by the monitors and other screens can damage your eyes.
With Microsoft improving the Windows operating system for a healthier approach, there is a built-in protection system against blue light in Windows 10. Here I shall be discussing Windows 10 night light, and how you can customize the Windows 10 blue light filter to protect your eyes.
Why Night Light For Windows 10?
Many studies have shown that the blue light that is emitted by the LED and LCD screens in various devices like monitors and mobile phones is very harmful to your health. When used for a longer time, the blue light affects the photoreceptors present on the retina of your eyes.
When the screens are used in dark environments like night, not only are the rod cells in your retina damaged, there is also a passive effect over the melatonin secretion. It is a hormone that is necessary for a good sleep cycle. Hence you will find that longer screen times are often related to disturbed sleep patterns, or in worst cases, complete sleep loss.
Windows Night Mode; A Healthier Option
To prevent the blue light from damaging your eyes, Microsoft has included a blue light filter in Windows 10. Night mode Windows 10 is a very useful feature, that users can use to protect their eyes and health when working for long hours in front of their Windows 10 devices.
If you do not wish to use the Windows night mode, there are many other applications from third-party developers that can be used for the same functionality.
When you enable the Windows 10 blue light filter, the operating system will switch the color profile to use warmer and slightly darker colors to soothe your eyes. This is very helpful for the users who use their devices for longer hours or need to work during night hours.
How To Customize Windows 10 Night Light?
To use the built-in Windows 10 blue light filter, you can enable it directly from the action center if you have customized it previously. To edit your action center and add night light, follow these steps:
- Open the action center by clicking the message icon in the taskbar.
- In the list of click-toggles, right-click on any one of these entries.
- Select Edit quick actions from the context menu.
- Click on the Add button.
- Here, you should see the Night light option pop up in a different menu. Click on this item.
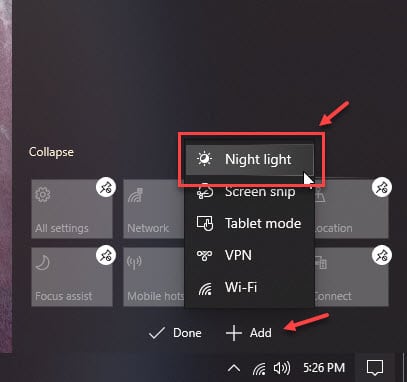
This will add the night light menu to the action center.
You can also customize the night light mode in Windows 10 from the Settings app. Use the keyboard shortcut Win + I to launch the Settings app and go to System > Display.
Under the Color subsection in the right pane, you will find the toggle for the Night light. Click on the Night light settings link to customize the feature.
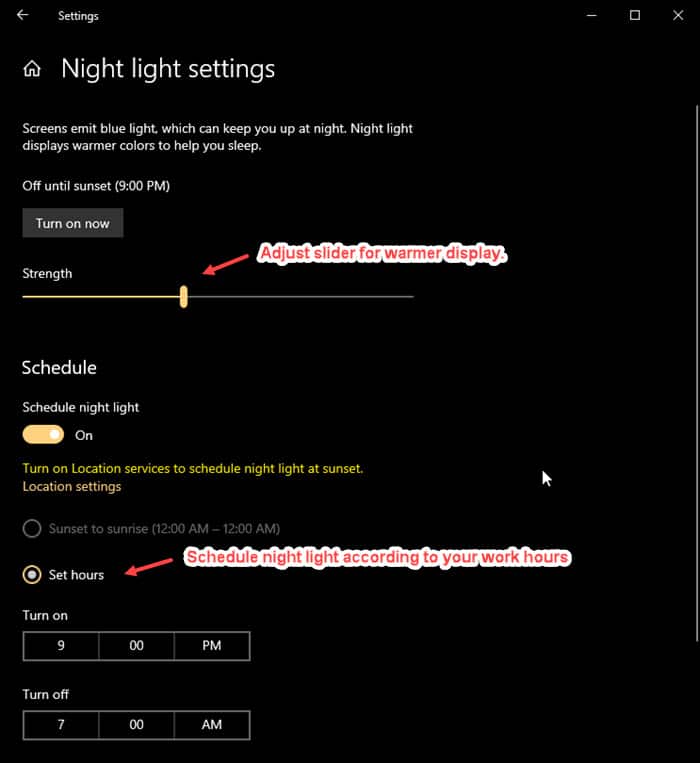
Night Light Settings
Inside the Night light settings, you can adjust the strength and the schedule of the Windows night mode.
- Use the Strength slider to select how warm you want the display to be.
you will see a real-time update of the color when you click on the slider for a quick reference. - Use the Schedule feature to automate the process of the night light turning on or off. If you have the location history provided, you can set the night light filter to be activated from sunset to sunrise.
Else, set the hours from the buttons that are provided.
Wrapping Up
So, there you have it. Now you know how to customize the Windows 10 night light using the simple methods provided above. Comment below if you found this useful, and share this with your dear ones to prevent damage to their eyes caused due to prolonged exposure to night light.
I’ve been looking for a short cut to the night light strength slider, like the brightness slider in the action center, instead of having to constantly go into settings. I need to adjust the strength to be more yellow when reading text, to less for other things.