Each device manufacturer adds certain applications and services unique to their brand of devices. These apps target to automate certain services, such as Windows 10 updates, firmware updates, junk cleaning, and much more. However, more often than not, users hardly find themselves using these applications.
If you do not find yourself using these applications, you may be wondering how to delete bloatware in Windows 10. While we have already covered how to delete preinstalled Windows 10 bloatware applications using other methods, here we shall focus on windows10debloater, which is a freeware PowerShell script designed specifically for this purpose.
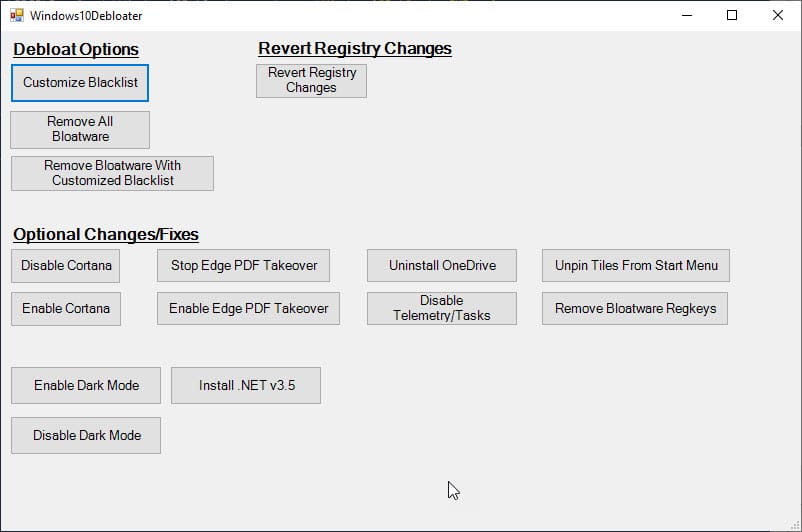
What Is Windows10debloater?
While the methods mentioned in our previous article is designed for all users, windows10debloater is mainly used by device administrators to remove certain components that they do not require on their computers. These components include promotional applications such as the telemetry components and games such as Candy Crush which is promoted with each new copy of Windows 10.
Essentially, windows10debloater is a PowerShell script that runs when granted administrative privileges. However, since Windows 10 natively blocks running scripts, you will have to read the website for the updated methods on how to run these scripts on your computer.
There are three versions of this Windows bloatware remover, each functioning slightly different than the other. These three versions of the Windows 10 bloatware removal tool are:
- Windows10SysPrepDebloater.ps1
This is the silent version of the script, which is executed automatically upon boot. The script runs with certain parameters which include the following:
- Sysprep parameter removes the Windows 10 bloatware within the function get-appxpackage | remove-appxpackage, which allows administrators to prepare their system for when the applications will be removed from their computer.
- The Debloat parameter removes the bloatware from your computer.
- When you add the Remove-keys switch along with the Debloat parameter, the PowerShell script will also remove the registry keys associated with the bloatware which is removed from your computer.
- Protect-Privacy parameter changes certain registry keys that block the telemetry collection functions, prevents Cortana from indexing your search, and disables the scheduled tasks among other functions.
- The optional switch Stop-EdgePDF blocks Microsoft Edge from being used as the default PDF viewer.
- Windows10debloater.ps1
This is the interactive version of the script, requiring active input from the user regarding the bloatware removal process. This is beneficial if the user requires complete control over what needs to be removed from the computer.
- Windows10debloaterGUI.ps1
As the name suggests, this is the graphical user interface version of the application. This may be essential for the users who are not comfortable running scripts and may end up using certain switches by mistake.
How To Use Windows10debloater?
Note: It is recommended that you create a system backup before using the tool, which will allow you to restore your data in case anything goes wrong.
Removing Windows 10 bloatware with this tool is actually quite easy, as you will simply be running a PowerShell script for removing the unnecessary applications from your computer. To use the Windows 10 bloatware removal tool, follow these steps:
- Visit the GitHub page of the tool, and download the zip file containing the three versions of the tool.
- Extract the tools using an archiver, or the built-in tool in Windows 10 that can be accessed from the right-click context menu.
- After the extraction completes, there are two methods that you can use to execute these scripts. Let us discuss the easier way in which you will not have to leave the PowerShell window after changing the execution policy.
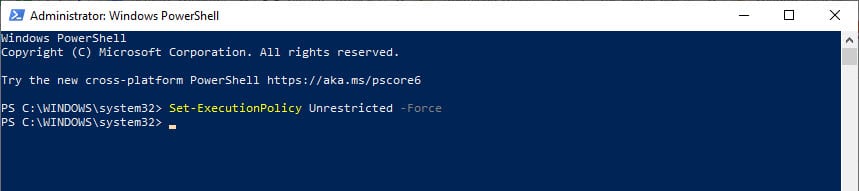
- Open an elevated PowerShell window, from either the start menu or the WinX menu, if you have not replaced PowerShell with CMD.
- Enter the following command in the admin PowerShell window and press Enter to change the execution policy of the PowerShell scripts:
Set-ExecutionPolicy Unrestricted -Force
- Next, change the active directory to where you extracted the debloater scripts using the cd switch.
- Now, simply enter the name of the script after a dot and backward slash (./ to denote relative location). Follow the image below for the same.
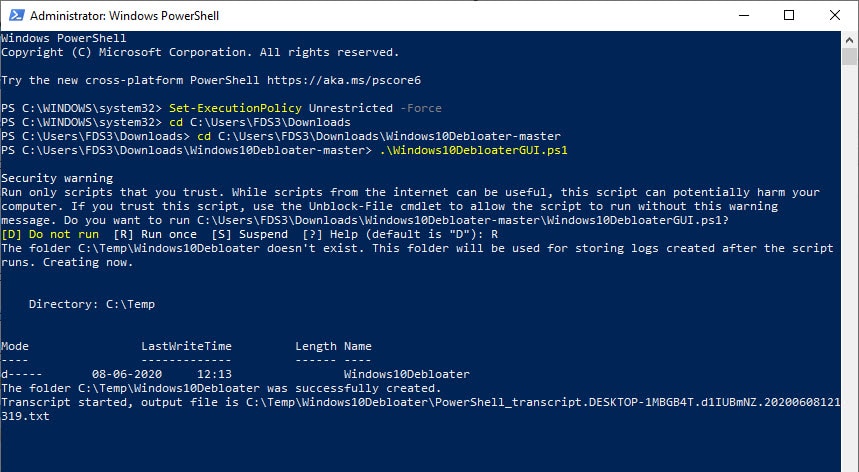
PowerShell will create the C:\Temp\Windows10debloater folder, which will be used for storing the logs created when you run the script.
Note: As mentioned earlier, for the Windows10SysPrepDebloater, you can use the additional parameters after entering the name of the script in step 7 above. For example, you can use the following text:
.\Windows10SysPrepDebloater.ps1 -Sysprep, -Debloat -Privacy
What Is Removed From My Computer?
On the same GitHub page, you will also find the information regarding the components which will be removed from your computer. Apart from all the bloatware removed, additionally, the tool also removes the following:
Registry keys: EclipseManager, ActiproSoftwareLLC, Microsoft.PPIProjection, Microsoft.XboxGameCallableUI
Scheduled Tasks: XblGameSaveTaskLogon, XblGameSaveTask, Consolidator, UsbCeip, DmClient
Wrapping Up
So there you have it. Now you know how to use windows10debloater to remove the unnecessary applications installed on your computer. Comment below if you found this useful, and to discuss further the same.