Steam has a huge fanbase throughout the world for gaming in Windows. Although being updated frequently, users reported having problems in Steam. Sometimes Steam runs so slow that the user can’t play the games. It consumes lots of CPU power, as well as memory usage, reaches its maximum that results in system heating.
It is a frequent problem. There are various solutions available to fix the Steam running slow easily. We have discussed all the possible solutions below. You need to follow these steps in order to make Steam run faster.
Also read: Steam Randomly Goes Offline – Ways To Resolve
How To Fix Steam Running Slow?
Before applying the solutions, you should have an idea about why is steam so slow. Keep on reading this article to know the reasons followed by the effective solutions below. These solutions are reported as working by many users. You should apply them on your computer until you find the one that works for you.
Solution 1: Clear Download Cache
Sometimes clearing the Steam download cache fixes the issue easily. A large amount of download data can make your Steam slow. To clear Steam’s download cache, follow the instructions here:
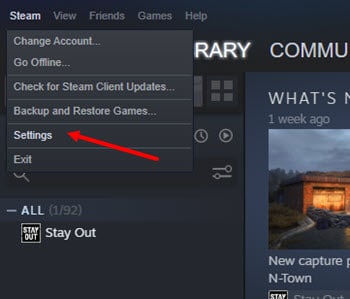
- Right-click on the Steam app on desktop and select ‘Run as administration’.

- After Steam opens, click on the Steam option at the top left corner.
- Select the Settings from the drop-down menu.
- Choose the Downloads section from the left pane.
- There is a button named Clear download cache. Press it.
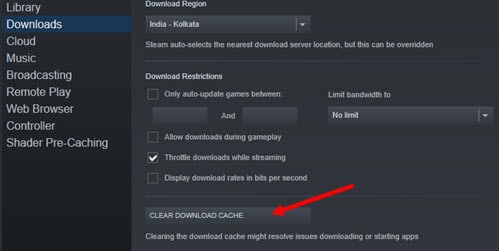
- Click on OK to confirm the action.

- The cache will be cleared in a few seconds.
- After clearing the downloads cache, restart the Steam app.
Now check if the Steam runs faster than the previous state.
Solution 2: Clear Steam’s Web Browser Cache And Cookies
Lots of Steam users fixed the Steam running slow by using this method. Steam has its own integrated browser to access the Steam store. Your Steam is slow due to the browser storing much data in its cache. It affects your PC performance also.
To clear the Steam browser cache, follow these steps:
- Right-click on the Steam app and choose ‘Run as administrator’ option.
- In the Steam app, navigate to the top left corner and click on the Steam option.
- Select the Settings option from the drop-down.
- In the Settings window, select the Web Browser option from left and click on the Delete Web Browser Cache option.
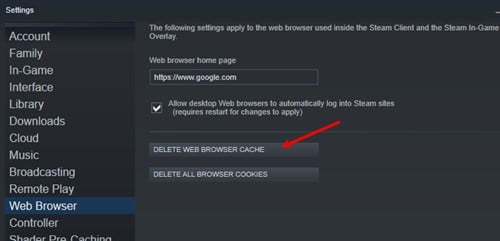
- Confirm to clear the cache by clicking on the OK button on the next window.
Performing these steps will clear the browser cache. Now clear the cookies as well.
- On the same Settings window, select Web Browser from the left pane and click on Delete All Browser Cookies option on the right.
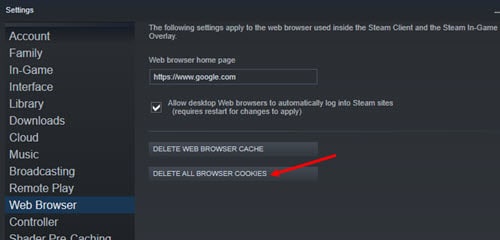
- Again click on the OK button to confirm the action.
Now the Cookies are also cleared. Restart the Steam app and check if the problem is resolved.
Also read: What To Do When Steam Says Files Failed To Validate And Will Be Reacquired?
Solution 3: Stop Unnecessary Background Programs
Running background services or programs that you are not using may result in Steam running slow. In most of the cases, the system heats up due to excessive CPU and memory usage when lots of background running programs are active. According to user reports, it is a common reason to make the Steam really slow.
If you are using Windows 7, follow these steps accordingly:
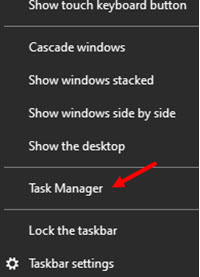
- Press the Ctrl + Alt + Del from the keyboard and select the Task Manager option. Alternatively, you can right-click on the taskbar and select the Task manager option from the list.
- Navigate to the Processes tab and you can see lots of background running apps here.
- Right-click on the process that consumes much CPU power and select End Process Tree option from the context menu.
- Repeat this task until you stop running all unnecessary processes.
Whether you have Windows 8 or above, apply these steps to end the background programs.
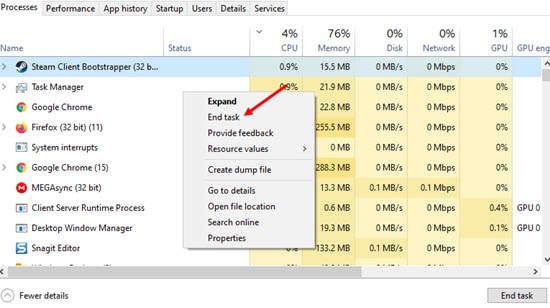
- Open the Task Manager following the process stated above.
- In the Task Manager window, check what processes are consuming much CPU and memory.
- Right-click on the resource-consuming process and select the End task option.
- Repeat this process till your satisfaction.
Once you finish ending all unnecessary programs, restart the Steam client and ensure that the problem is fixed.
If you notice that the problem still appears, continue to the next solution.
Solution 4: Check Pending Device Driver Update
This frustrating problem might continue due to faulty or outdated device drivers. You need to check if there is any driver update available or any pending update remained uninstalled. If you don’t know how to update the device driver, read how to update the device driver using the Device Manager here.
If there is nothing wrong with the device driver, check the next solution.
Solution 5: Adjust The Proxy Settings
Changing the proxy settings is another effective solution according to the user reports. To know how you can change the proxy settings, follow the below-provided instructions:
- Click on the Start icon and type Internet options.
- Select Internet Options from the appeared search result.

- Now navigate to the Connections tab and click on the LAN Settings options.

- You can see the option ‘Automatically detect settings’ with a checkbox next to it. Uncheck the box if enabled.

- Now click on the OK button to save the change.
Restart the Steam app and check if the problem is resolved.
Solution 6: Repair Steam Service
Still see Steam running slow? Well, it might occur when there are some corrupt or missing files that exist in the Steam installation folder. You should repair the program to ensure that the reason behind slow Steam is nothing but some corrupted or missing system files.
To repair the program, Do the same as below:
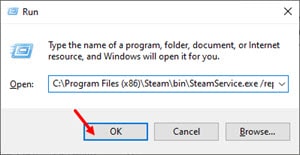
- Press the Win + R key from the keyboard and type the following command.
C:\Program Files (x86)\Steam\bin\SteamService.exe/repair
- Hit the Enter key to run the command.
- A black window will appear on the screen. You should not close the window until the process completes.

- As soon as the process ends, restart the Steam app.
Now test whether the Steam is running faster than before.
Solution 7: Verify Integrity Of Game Files
Sometimes, the Steam gets slower or becomes unresponsive when you try to run a specific game. It happens when there are some missing or corrupted game files that exist in the installation folder. In such a case, checking the integrity of game files is important. The steps are discussed below how you can verify the integrity of game files.
- Open the Steam app and select the game in which Steam overlay gets failed to open.
- Right-click on the game and select Properties option from the context menu.
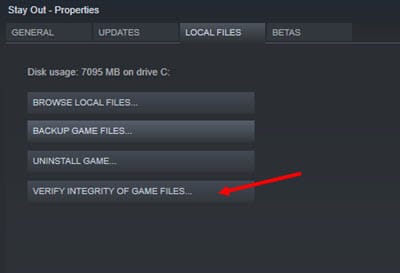
- Shift right to the Local Files tab.
- You can see an option named VERIFY INTEGRITY OF GAME FILES below. Click on that option.
- Steam will start verifying the game files. If any missing or corrupted files are found, it will download the file and fix the issue automatically.
- When the Verification successful window appears, click on the Close button.
- Go back to Steam home.
- Now go to Steam settings by clicking on the Steam option at the top left corner and selecting the Settings option from the drop-down menu.
- Select the download option from the left pane.
- Click on the Steam Library Folder under the Content Libraries section on the right.

- You can see all the installed games listed here. Right-click on the problematic game and select the Repair Library Folder option.
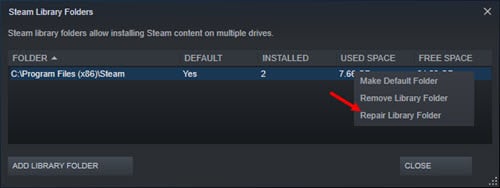
- After completing the repair process, restart the Steam app.
Now your Steam should run properly.
Also read: Steam Not Remembering Password: Easy Fixes!
Solution 8: Reinstall Steam Client
If you find the problem still continues, you should reinstall the Steam program. You need to uninstall first in order to reinstall it. The uninstallation process is described below. Follow these steps carefully.
- Right-click on the Steam app shortcut on the desktop and select Open file location option.
- Locate the steamapps folder and copy it. Move this folder to another location as a backup.

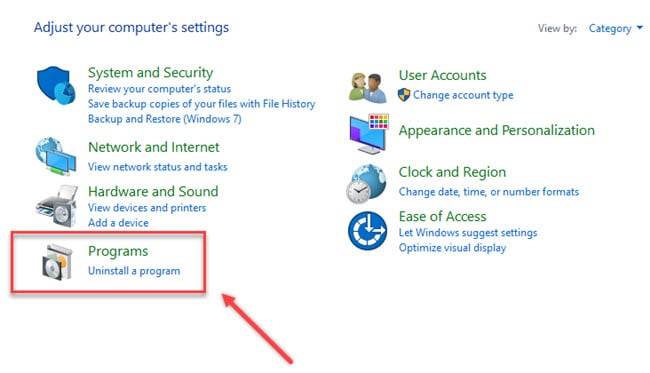
- Now click on the Start icon and type Control Panel in the box.
- Select the Control panel option from the search result to open the Control Panel app.
- Select the Programs and Features option.
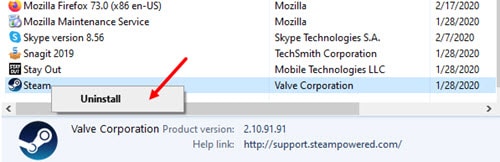
- You can see all the installed programs listed here. Find the Steam app.
- Right-click on the Steam and select the uninstall option.
- Follow the on-screen instructions to complete the Steam uninstallation.
- After removing the Steam completely from your PC, download the Steam program from the official website. You can also click here to download Steam.
- After Installing Steam, right-click on the Steam icon on the desktop and select the Open file location option.
- Move the steamapps folder from the location where you previously backed it up to the current directory location.
- Finally, restart the Steam program.
The problem should be fixed now as the program is installed newly.
Conclusion
Now you know why is Steam so slow on your computer and how you can fix it. These solutions have the highest success rates according to users. Following these solutions and steps will definitely make Steam run faster easily. Which of the solutions worked for you? Let us know by commenting below. If you still have queries regarding Steam running slow, feel free to tell us here.
I’ve tried every solution listed, and nothing has worked. I can’t so much as scroll down the Steam page without a 4-5 second delay. I have no idea what to do.
I’ve used every solution including reinstalling Steam and it still runs incredibly slow. I’d like some help with this as soon as possible.
After repairing System Service, the problem is solved. Thank you.