Microsoft has switched to the new chromium-based Edge as the default browser in Windows 10. However, operating system still ships with the old Internet Explorer, as many Internet settings are still routed via the legacy browser.
With the advancement in Internet technologies, the old web technologies are all but extinct. So, here I shall discuss how to uninstall Internet Explorer 11 from Windows 10.
Uninstall Internet Explorer 11
If you do not find the use of the legacy browser on your computer, you can simply remove Internet Explorer. Many new websites also have dropped the support for Internet Explorer, adding to the reason why you should remove old browser.
However, Internet Explorer is still deeply integrated with the Windows 10 operating system. This means, that you cannot completely uninstall the browser using the GUI elements, as it may cause stability issues. Instead, use these 2 simple methods to remove the browser from your computer.
Method 1: Use The Turn Off Features Menu
Internet Explorer has been moved do the optional features section off the operating system, meaning that you can turn it off if you do not find the use for it. You can do this from the control panel applet, and here are the steps that you need to follow:
- In Windows search (Win + S), type Turn windows features and wait for the search results to appear.
- Click on the ‘Turn Windows features on or off’ control panel entry that appears.
This will open the Windows Features window. - From this window, uncheck the box next to Internet Explorer 11, and click on OK button.
- Select Yes in the confirmation dialogue box, and restart your computer for the changes to take effect.
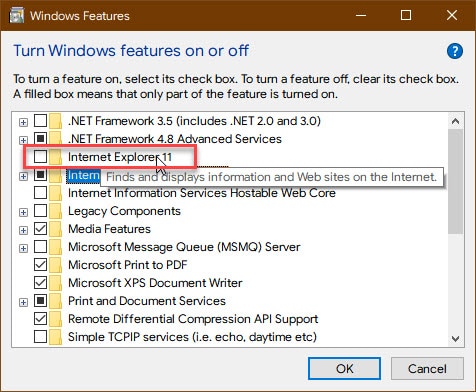
Note that this does not remove the core Internet Explorer files from your computer. You can check the box in Step 3 to bring back the browser.
Method 2: Use A Powershell Command
To save time, you can use the command line interpreter 2 quickly uninstall Internet Explorer 11 from your computer. Follow these steps for the same:
- In Windows search, type powershell.
- Right click on the search result, and select Run as administrator from the context menu.
This will open PowerShell with elevated privileges. - Type the following command and the press Enter to disable Internet Explorer 11 from your computer:
Disable-WindowsOptionalFeature -FeatureName Internet-Explorer-Optional-amd64 –Online - Type Y in the confirmation prompt and restart your computer.
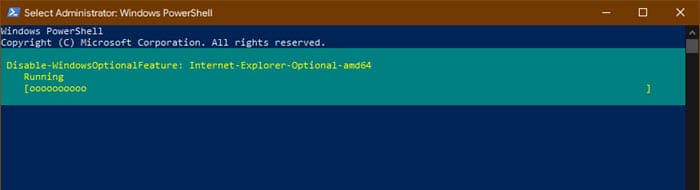
After the restart, Internet Explorer will be removed from your computer.
Note: To reinstall IE 11, use the following command:
Enable-WindowsOptionalFeature -FeatureName Internet-Explorer-Optional-amd64 –Online
Wrapping Up
So there you have it. Now you know how to uninstall Internet Explorer 11 on Windows 10 using the methods provided above. Comment below if you found this useful, and to discuss further the same.