On Android and other operating systems, you may have noticed the small checkboxes, which appear when trying to select multiple files at once. These small checkboxes present on the left side of the file manager helps you select and then perform actions like copy, move, delete etc. on multiple files all at once.
However, if you see these checkboxes in Windows 10, and do not need these, here I will show you how to remove checkbox icons from Windows 10.
Remove Checkbox Icons From Windows 10
If you too prefer using the Ctrl Key for selecting multiple files instead of the checkboxes, there are two ways to remove checkboxes in Windows 10. Here i shall discuss both of these methods for easy removal of check marks on icons.
Method 1: From Folder Options
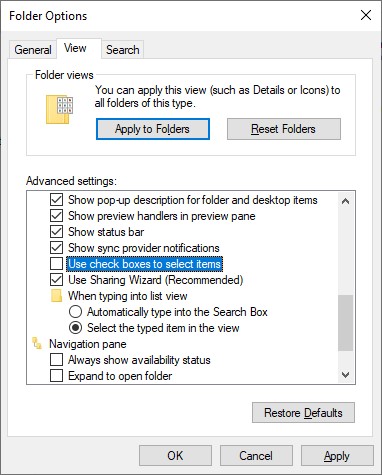
To remove the checkbox from file Explorer, you need to perform this action from the folder options. The Folder Options is where all the settings are stored for your Explorer. Simply follow these steps to do so:
- Open File Explorer. You can use the keyboard shortcut Win + E.
- On the top left corner, locate and click on File.
- From the extra context menu that appears, click on Change folder and search options.
- Under the View tab in Folder Options, scroll towards the end of Advanced settings.
- Here, locate and uncheck the box next to a setting that says ‘Use check boxes to select items’.
- Click on Apply followed by OK. You will see that there are no more check boxes if you choose not to show them.
In Windows 10, this method seems very long and involves a lot of steps, so the setting has been moved to an easier location for quick toggle.
Method 2: From The View Tab
You can effectively change the checkboxes from the File Explorer UI as well. This is much faster and can help you change the settings much easier.
- Open File Explorer. You can use the keyboard shortcut Win + E.
- In the top ribbon, go to the View tab.
- Here, in the last section titled Show / hide, uncheck the box next to ‘Item check boxes’

Now, when you restart Explorer, you will no longer see the item checkboxes next to File Explorer items.
How To Remove Check Marks On Desktop Icons
Many users have reported that they see an icon overlay showing a green tick on their desktop icons. This is an overlay left by cloud apps that are markers that the selected file has been synced correctly to the cloud.
This can be annoying at times, as these overlays often stay even after you have uninstalled the cloud app. At such times, you need to build the icon cache again. I will provide an easier method to do so in Windows 10 making the use of Command Prompt.
- Open an elevated command Prompt. To do so, open a Run Window by pressing Win + R. Type cmd and press Ctrl + Shift + Enter to launch command prompt with administrative privileges.
- Now you need to type a series of commands and press Enter at the end of each command.
ie4uinit.exe -show
taskkill /IM explorer.exe /F
(note:- your desktop will go blank)
DEL /A /Q “%localappdata%\IconCache.db”
DEL /A /F /Q “%localappdata%\Microsoft\Windows\Explorer\iconcache*”
Shutdown /p
note:- your computer will immediately shutdown)
![]()
Since these check marks are not part of the icon itself, there are no easy methods to remove them from the settings.
Wrapping Up
Although the icon check boxes may benefit some users, it is usually wasted on Windows where many users are used to using the quick keyboard shortcuts i.e. Ctrl for selecting multiple files and Shift key for selecting a range. Now you know how to remove checkbox icons from Windows 10 using the methods above. Comment below if you found this useful in successfully removing checkboxes in Windows 10.