With Windows 10, Microsoft also started pushing its services to the customers. One of the most popular services is the search engine Bing, which is well integrated within Windows 10 as well. With some latest updates, you can directly search for your queries in the search bar.
However, this can quickly become annoying if you only see the search results from Bing when you want to search for local files and folders. The search engine is deeply integrated into Windows and will show unnecessary results from the internet instead of the intended search.
Here, I shall discuss how to disable Bing search in the Windows Start menu, and how to permanently remove Bing from Windows 10.
How To Disable Bing Search In Windows Start Menu?
Earlier, Bing was part of the Cortana process and was handled by a different registry DWORD entry than the search and Cortana. Changing this required adding two registry entries to the Registry Editor, which is discussed further below. In the latest Windows 10 update, there is a new registry entry that handles this request.
Follow these steps to disable Bing search in the Windows Start menu:
- Open a Run dialog by pressing Win + R.
- Type regedit and press Enter to launch the Registry Editor. Click on Yes in the User Account Control Prompt.
- Navigate to the following location, by pasting the path in the address bar of the Registry Editor:
Computer\HKEY_CURRENT_USER\SOFTWARE\Policies\Microsoft\Windows\Explorer
Note: If you do not find the Explorer key, create it from the right-click context menu. - In the right pane, right-click, and hover on New> from the context menu.
- Select DWORD (32-bit) from the additional menu.
- Name the entry as follows:
DisableSearchBoxSuggestions - Double click on this created value to edit the value data and set it to 1.
- Click on OK and restart your computer for the changes to take effect.

Once you restart your computer, the Bing integration will be removed from the Start menu, and you should not see search results from the internet. Unlike the older method, you may still see the Bing and Edge advertisements when you use Chrome as your default browser.
Note: You can try piling both these fixes on top to permanently remove Bing from your operating system.
Older Method To Remove Bing From Windows 10
As the May 2020 update is relatively new at the time of writing, not all systems have this update. If you still have not updated to the latest version of the operating system, you will need to follow the older method. Here are the steps you need to follow:
- Open the Registry Editor as mentioned above.
- Navigate to the following location by pasting the path in the address bar of the registry editor:
Computer\HKEY_CURRENT_USER\Software\Microsoft\Windows\CurrentVersion\Search - In the right pane, right-click, and hover on New> from the context menu.
- Select DWORD (32-bit) from the additional menu.
- Name the entry as follows:
BingSearchEnabled - Open the value data box by double-clicking on the DWORD file you created and set the value data to 0.
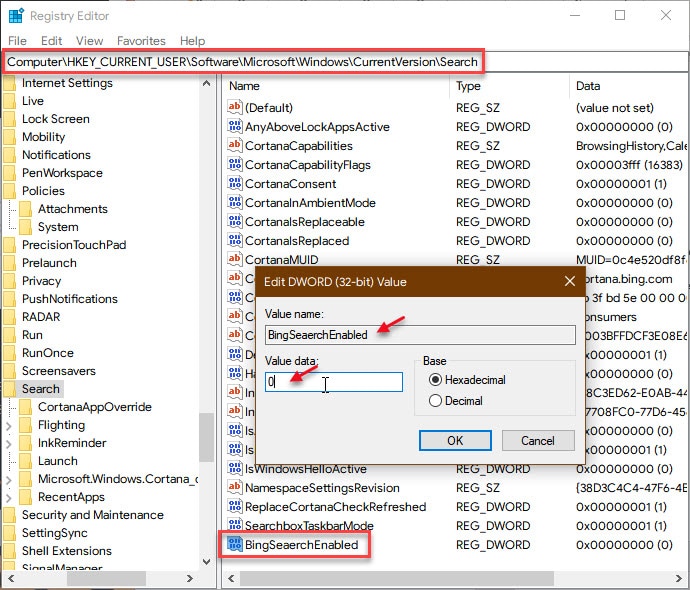
- Click on OK.
- Next, locate and double click on the following entry:
CortanaConsent - Change the value data to 0 for this entry as well.
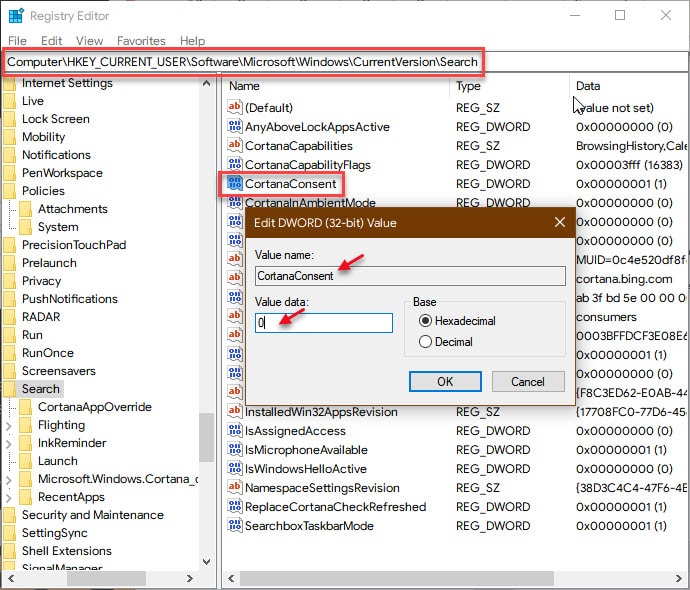
- Finally, click on OK and restart your computer for the changes to take effect.
This is the older method to permanently remove Bing from Windows 10, and you should also not see the Bing advertisements as mentioned above. However, since in each update Microsoft changes the Registry keys that handle various functions, this may change in the future iterations.
Why Does My Search Engine Keep Changing To Bing?
In a weird turn of events, when you install Google Chrome on a new Windows 10 device, you may notice that your default search engine is Microsoft Bing instead of Google Search. Since Google’s search engine is more popular among users (and it is better at times as well), you may be wondering why does the search engine keeps changing to Bing?
One of the most common reasons why you will see this happening is due to browser hijackers, which is a type of virus. This can come bundled with other applications, or even browser extensions. Potentially unwanted programs (abbreviated as PUPs) may be installed on your computer, which causes the search engine to keep changing to Bing.
Solution 1: Change The Default Search Engine
As mentioned above, Windows 10 may sometimes change the default search engine for the installed browsers to Microsoft Bing even if you do not want it to. This is fairly easy to resolve most of the time, as all you need to do is change the default search engine in your browser settings.
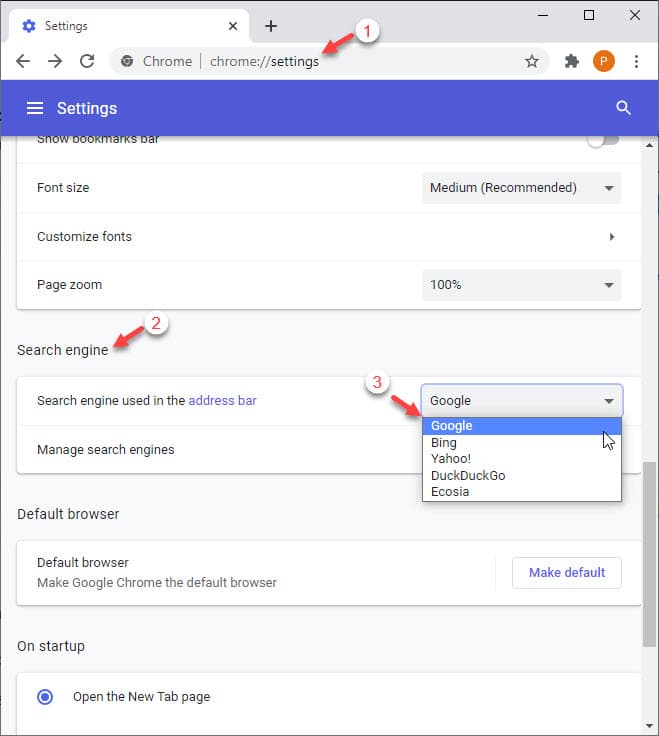
For Google Chrome (and most other Chromium-based browsers), follow these steps:
- Open Google Chrome on your computer and click on the three vertical dots menu icon next to the address bar.
- Click on Settings from the context menu that appears.
- Scroll down to the Search engine section.
- Change the search engine used in the address bar option from the drop-down menu next to the option.
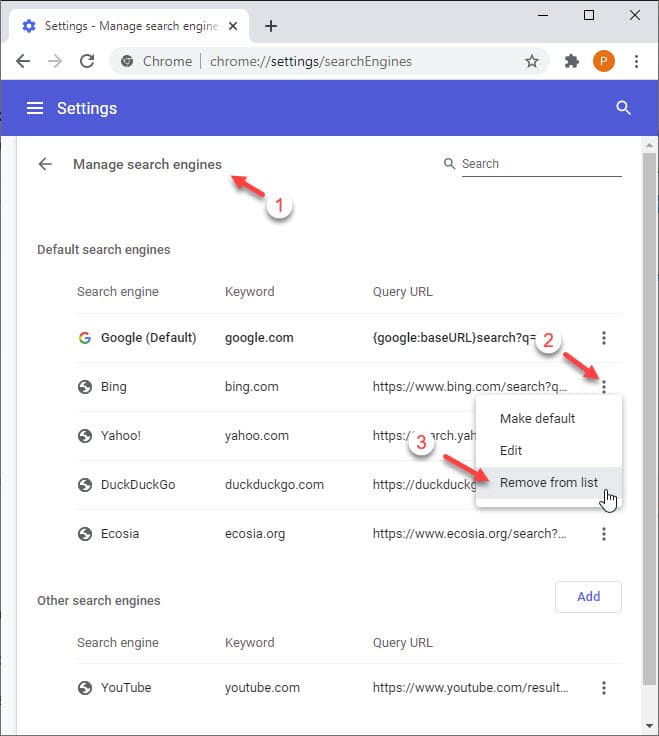
Note: If you want to remove Bing permanently from Windows 10, you can remove the Bing search engine by clicking on the Manage search engines option.
Solution 2: Run A Virus Scan
If you notice your search engine keeps changing to Bing even after changing the default option in solution 1, there is a high chance that you have a virus or malware in the form of browser hijacker installed on your computer. One of the first things you should do immediately is running a virus scan to eliminate such applications from your computer.
If you do not own a premium antivirus service, you can also use freeware such as Avast antivirus and Malwarebytes antimalware. Run a deep scan to check for hidden threats, and remove any threats found on your computer.

Another step you can take involves removing any recent third-party application you installed, especially from unknown sources. Such applications may have a malicious code, which serves as the browser hijacker.
Wrapping Up
So there you have it. Now you know how to disable Bing search in the Windows Start menu, and how to stop Bing from hijacking your browser using the information provided above. Comment below if you found this useful, and to discuss further the same.
HI Anubhab,
Tried all the methods you outlined to remove BING,with no success. Bing has hi-Jacked my Firefox browser and I cannot remove it. I tried uninstalling Firefox which didn’t work. My next step is to uninstall Windows 10 which I am reluctant to do. I have windows 10 Pro version 20H2 build 19042.1052. Any ideas??
i want to remove bing now
I want Bing removed NOW
Help me remove Bing from my computer please.