Microsoft provides you an amazing feature like Windows Remote Desktop.
You can access your office machine privately or remotely and for the local network administration with the help of Windows Remote Desktop.
But often due to some firewall or internet-related problems you may encounter remote desktop not working error. There are a few more reasons to trigger this annoying issue.
What Triggers Remote Desktop Not Working Issue?
Remote desktop not working issue mainly occurs when the remote computer is switched off or you are having a poor internet connection.
Sometimes if you have mistakenly put some wrong credentials during log in it may raise the issue.
If the RDP is not working even after you have updated the Windows or there is a problem in the network profile, this problem gets generated.
Whatever reason may have caused the remote desktop connection not working issue, let us explore some ways through his article to solve the issue.
Solution 1: Check If The Remote Desktop Connections Is Allowed
Whenever you face the Windows 10 remote desktop not working problem, give a check whether you have allowed the Remote Desktop connections.
If somehow it is not allowed, you will get to meet this error. So, follow the steps given below to run a check:
Step 1: Go to Settings and then select Update & Security window.
Step 2: Now, move on to the For Developers Section and search for Change Settings and check to allow remote connections to your computer. This option is there in the right pane.
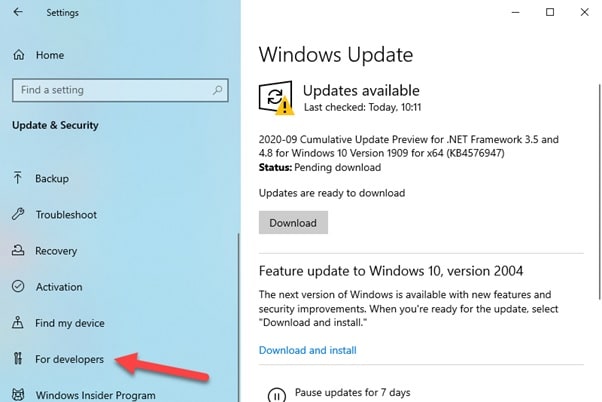
Step 3: After that, choose Show Settings right beside it and Check the box given next to Allow Remote Assistance Connections to this Computer.
Step 4: When you finish that, hit the Apply option and then OK to save the changes you have made.
Step 5: Now get out of the window and check if the issue is resolved.
Method 2: Make Some Changes In The Firewall Settings
If you are stuck with a remote desktop connection not working issue, you may try to make some changes in the Firewall and that may fix the issue.
Sometimes this problem gets generated due to your antivirus or firewall. So, changes in the settings may help you someway.
Here I a providing you with a complete guideline to execute the task. Please follow the steps given below:
Step 1: First go to the search box and enter Allow App Through Windows Firewall. Next, select the best one that matches.
Step 2: Now, select Change Settings and search for Remote Desktop. Next, check the box just below the Private tab
Step 3: Finally hit the OK button to save the changes. Get out of the window and check if this has solved the problem with remote desktop.
Method 3: Add IP Address Of The Remote Computer To Your Hosts File
You may try this process to fix Windows 10 remote desktop not working problem. You can do this by adding the IP address of the remote computer to your hosts file.
Follow the method described below to perform the task:
Step 1: In the search box, enter cmd and commence the elevated Command Prompt.
Step 2: Then enter cd C:/Windows/System32/Drivers in the displayed window. Next hit the ENTER button.
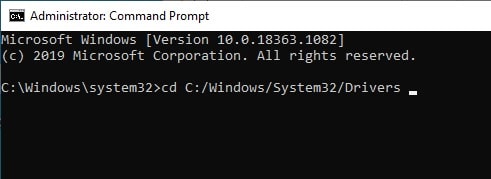
Step 3: Now in the given window, by typing Notepad Hosts hit the Enter button to open hosts file.
Step 4: After that add the IP address of the Remote Computer to the end of the hosts file. Next, select the File option and save the changes done so far. After that close the window.
Step 5: Now set to connect the remote computer and you will find that the issue is addressed.
Method 4: Delete The Credentials Of Your Remote Desktop
Sometimes it may happen that you have forgotten or by mistake did put the incorrect credentials for Remote Desktop.
Then you will encounter remote desktop can’t connect to the remote computer error when trying to get connected with another remote computer!
We will recommend you go for resetting the credentials. Here we are discussing how to commence the task. Please follow the below-mentioned steps:
Step 1: In the search box, enter Remote Desktop connection and choose what matches.
Step 2: Now enter your IP address. In case you have saved the credentials for your device, you will find the option for editing or removing.
Step 3: Choose the Delete option to erase the credentials. Next, connect the remote computer to see whether this has addressed the error.
Method 5: Alter The Network Properties From Public To Private
Change the network properties from public to private to solve the burning issue with remote desktop.
Check whether the network properties are set as public and then proceed for the changes.
Follow the process and you will be able to accomplish the task smoothly.
Step 1: Go to Settings and select Network & Internet option.
Step 2: Now visit the Status tab to choose Change Connection Properties from the right pane.
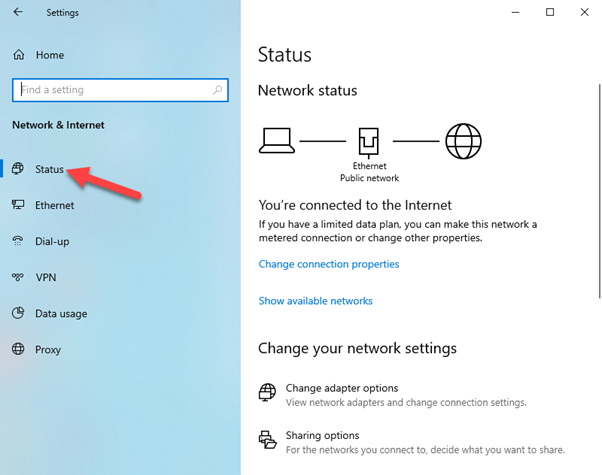
Step 3: Now select Private if it was not done before. Connect the remote computer and check whether you have solved the problem.
Method 6: Perform A Registry Tweak
By making some changes in the Registry Editor you may resolve the remote desktop can’t connect to the remote computer problem. Follow the mentioned workaround to perform the work:
Step 1: First of all open the Registry Editor.
Step2: Search and choose the HKEY_CURRENT_USER\Software\Microsoft\Terminal Server-Client option fro the displayed unit.
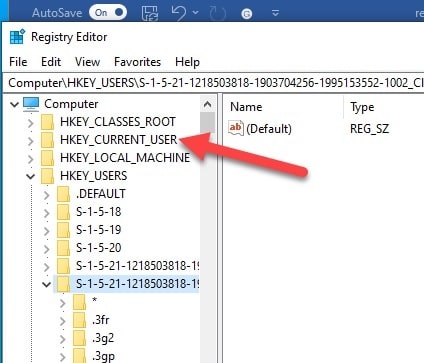
Step 3: Next right-click on the blank space and select New > DWORD (32-bit). Now, rename it as RDGClientTransport.
Step 4: Double-click the key and go to its Properties. Set the value data to 1. After you have finished performing the entire procedure, click OK, and save the changes.
Closing Words
So, I hope by now, you are able to find out a suitable solution if got annoyed when the remote desktop is not working! If you still have queries related to this issue or any other folder, please communicate us in the comments section provided below.
Feel free to shoot us a mail with your ideas or suggestions. We always look forward to hearing back from you.