NVIDIA is one of the most popular graphics chips manufacturers in the PC environment. The computers that have this chip installed also come with a control panel called GeForce Experience, which can be used to fine-tune the settings and properties of the chips.
Some users have recently reported that they see the NVIDIA control panel missing from their computer. According to them, the users can’t find the NVIDIA control panel on the desktop context menu, start menu, or anywhere on the computer. This can be due to many different reasons, including corrupt graphics drivers, missing registry keys or other random errors.

Fixes For NVIDIA Control Panel Missing
There can be many reasons why you may be seeing the NVIDIA control panel missing from your computer. Whatever may be the reason, here are some simple solutions that you can try to troubleshoot and solve if the NVIDIA control panel is missing from your Windows 10 device.
Solution 1: Enable Desktop Client
Very often, the NVIDIA control panel can become hidden from the desktop context menu due to many different issues. This can be misleading, as users may think that the NVIDIA control panel has gone missing from their computer. However, this can be very easily rectified, and you can bring back the NVIDIA control panel to the desktop context menu.
Simply follow these steps to check and enable the NVIDIA control panel in the desktop context menu:
- Open a Run dialog by pressing Win + R.
- Type control panel and press Enter to launch your computer’s control panel.
- Next, change the view to Large or Small icons if previously set to Category.
- Locate the NVIDIA control panel entry and click on it. This will launch the NVIDIA control panel application.
- Click on View or Desktop to reveal the additional menu.
- Here, make sure that the option that says, ‘Add Desktop Context Menu’ is enabled. You should see a checkmark next to the icon if it is enabled.
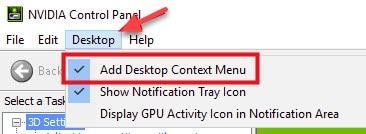
- Apply the changes, and you should be able to see the NVIDIA control panel in the desktop right-click context menu.
If the NVIDIA control panel was already installed on your PC, but missing from the desktop right-click context menu, it should now be solved.
Solution 2: Delete And Download Drivers Again
One of the best solutions, as suggested by the NVIDIA help page themselves, is to delete the NVIDIA folder in safe mode, and then download the drivers again. This can be effective in many scenarios, like corrupt or missing device drivers. To apply this fix, follow these steps:
- Boot into safe mode. To do so, either follow this guide to use F8 key in Windows 10 or navigate the following path:
“Settings” > “Update & Security” > “Recovery” > “Restart now” - Your PC will restart automatically, and you will get into the screen of Advanced troubleshooting tools.
- Here, follow this path:
Click “Troubleshoot” > “Advanced options” > “Startup Settings” > “Restart” - Press the F4 key from your keyboard and enter the Safe Mode.
- Navigate to the hard disk partition that has your operating system installed on it.
- This is the NVIDIA control panel location.
Here, locate and delete the NVIDIA folder from your computer. - Next, open a Run dialog by pressing Win + R.
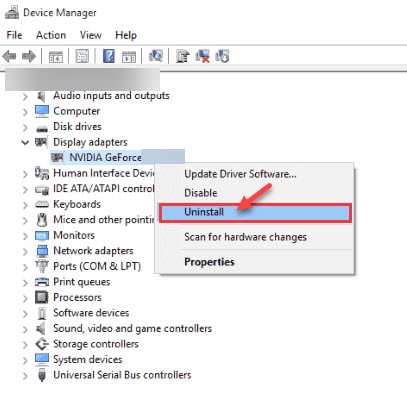
- Type devmgmt.msc and press Enter to launch the Device Manager console.
- Expand the Display adapters option by clicking on the small arrow next to it.
- Right-click on the NVIDIA adapter, and select Uninstall from the right-click context menu. Click on OK in the confirmation prompt.
- Reboot your device into normal mode.
- Download the NVIDIA driver from the official website.
Run the setup file that you just downloaded, and follow the instructions that appear on the screen.
Pro Tip: Choose Custom install instead of Express. From the installation settings, perform a ‘clean install’, which will allow you to remove any previous profiles that may have been causing any mismatch issues.
Solution 3: Restart NVIDIA Control Panel Services
The services running in the background are partly responsible for keeping Windows 10 running smoothly in the background. There many services associated with NVIDIA and other applications, which keep the applications up to date, and helps in the functioning.
However, if the services are locked down due to some reason, the applications that these services facilitate also start malfunctioning. This can be the reason that you see the NVIDIA control panel missing from your computer. Fortunately, this is fairly easy to solve, and you need to follow these steps:
- Open a Run dialog by pressing Win + R.
- Type services.msc and press Enter to launch the Services console.
- In the list of available services, look for the services that are associated with the NVIDIA app. These include:
NVIDIA Display Container
NVIDIA LocalSystem Container
NVIDIA NetworkService Container
NVIDIA Telemetry Container
Right-click on these services one by one and select Restart from the context menu.
Note: If the service is not running, click on Start from the menu.

This method should help you bring back the NVIDIA control panel on your desktop.
Solution 4: Manually Launch The NVIDIA Control Panel
If you know the NVIDIA control panel location, you can launch the NVIDIA control panel manually till you find a permanent solution. Here are some simple steps to launch the NVIDIA control panel manually:
- Open This PC folder. You can use the keyboard shortcut Win + E.
- Here, go to the partition where you have your operating system installed on (usually the C drive)
- Look for the Program Files folder.
- In the Program Files folder, you will find a folder named NVIDIA Corporation.
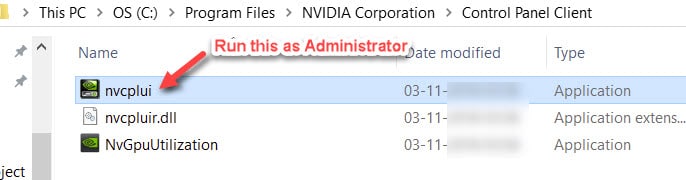
If you are unable to find the NVIDIA Corporations folder in here, you need to look for the folder in the Program Files (x86) folder. - Once you are in the NVIDIA Corporation folder, open the Control Panel Client folder.
- In this folder look for a file titled nvcplui.
- Right-click on this file, and click on Run as administrator from the context menu.
If you want, you can also create a desktop shortcut for the same, until you find a more permanent solution from the developers themselves.
Solution 5: Add NVIDIA Control Panel To Startup Folder
If none of the solutions provided above failed to help you solve the error on your device, you can try a more permanent solution that many users have reported worked for them. This solution is also from the NVIDIA development team, hence you can follow these steps without worry:
- Open File Explorer. You can use the keyboard shortcut Win + E.
- Navigate to the following folder by pasting this location in the address bar:
C:\Program Files (x86)\NVIDIA Corporation\ Display.NvContainer
Note: If you are unable to locate the NVIDIA folder in the Program Files (x86) folder, you need to look for it in the Program Files folder. - In the Display.NvContainer folder, you will find a file named Display.NvContainer.
- Right-click on this file and select Copy from the context menu.
- Open the Startup Folder. To do so, open a Run dialog box by pressing Win + R. Type shell:startup and press Enter to launch the Startup folder.
- Paste the Display.NvContainer file in this folder.
- Next, right-click the Display.NvContainer file and select Properties from the context menu.
- Under the Compatibility tab, check the box next to Run this Program as an Administrator.
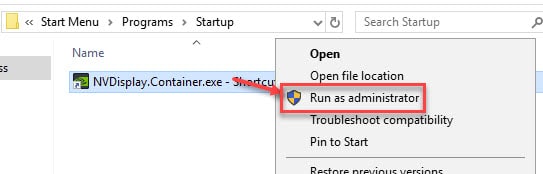
- Click the Apply and OK buttons to save the changes.
- Restart your PC.
This should solve your NVIDIA control panel missing error, and you should be able to freely access the control panel and change your settings.
NVIDIA Control Panel Download
As per the latest Microsoft service requirements, the NVIDIA control panel is not included in the driver package. Instead, it is distributed exclusively through the Microsoft Store. Thus, the NVIDIA control panel will be installed on your computer after you successfully complete the installation of the NVIDIA Drivers.
There are certain system requirements, which need to be fulfilled before you can install the NVIDIA control panel application. These are:
- NVIDIA GPU with DCH1 driver installed
- Microsoft Windows 10 Fall Creators Update or later (version 1803 build 17134 or higher)
- X64 CPU
- Windows update service needs to be running (with an active internet connection)
How to get NVIDIA control panel
However, if you still can’t find NVIDIA control panel, there is a chance that it is not installed alongside the NVIDIA DCH display driver. In cases like these, you need to install it manually from the Microsoft store, that you can access using this link.
Conclusion
So there you have it. Now you know how to solve if you see the NVIDIA control panel missing from your computer. Comment below if you found this useful, and to discuss further the same.
Thank you so much. I was going crazy uninstalling and reinstalling stuff just to realize that the newer driver packages don’t include the nv control panel. It is an ugly decision on Microsoft’s part…
The last hint about Microsoft Store NVidia app should be listed as a first one !