Microsoft developed this proprietary video editor that got officially discontinued in 2017 but many users prefer to use it till today.
For editing and making videos easily and sharing to social media Windows Movie Maker is popular to date.
The Windows Movie maker may stop working while trying to open files and the software tends to crash or freeze during playback or have audio issues.
For this reason, you may need to go for Windows movie maker troubleshooting.
Here in this article, I am going to discuss about the possible causes and remedies when movie maker has stopped working.
How To Execute Windows Movie Maker Troubleshooting?
When you are having issues with Windows movie maker troubleshooting, you can better choose a third-party alternative.
Updating your graphics card is a good option if the issue is caused by an antiquated graphics card.
For fixing the issue you can also try to repair the live essentials suite or choose to run Movie maker in Compatibility mode.
There are a few more methods to check the error that I am going to discuss in detail now. Have a look!
Method 1: Choose An Alternative Video Editing Software
Nowadays you have many trendy video editing apps that work at a professional level.
Compared to Windows Movie Maker they are upgraded and equipped with modern features.
If this software refuses to work on your computer, then you must choose another handy alternative to your Windows Movie Maker when you are having Movie Maker problems.
You have many alternatives to choose from like – Adobe Premiere Pro, Camtasia, VideoProc Video Editor, and many other leading video editors.
You can also enjoy the free trial periods offered by the manufacturers and then choose the best alternative for yourself.
Also read Top 7 Video Editing Software!
Method 2: Update Your Graphics Card Driver
The corruption in the drivers may cause the issue like Movie Maker has stopped working.
Sometimes your drivers may be outdated and need an update. So, remember to re-check your drivers as this can cause you a lot of problems with your system.
First, you need to go to the Device Manager or Windows Update and check for the latest available updates for your graphics card driver.
Visit the website of the manufacturer and from there you need to download the latest driver required as per your model.
Then proceed for the installation of the driver. It is a bit tiring job to download the drivers manually. So, remember to check the specific model of your device.
You may also take the help of a third-party tool for downloading and installing the drivers instantly.
Now check whether your driver is compatible with your system, and you can continue with your programs smoothly.
Method 3: Deselect Third-Party Video File Filters
In case the third-party video file filters are not compatible then you may receive the Movie Maker has stopped working error message.
So, it is a better option to disable the third-party video filters on the Compatibility Tab of your Movie Maker in case you are still using the Classic Version.
Now follow the steps mentioned below to accomplish the task:
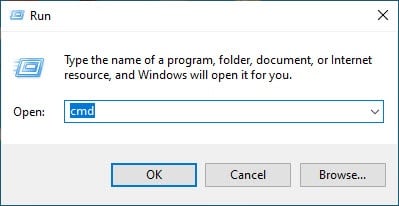
Step 1: Go to your Run dialog box by pressing Win + R keys. Then type CMD in the box and hit the Enter button.
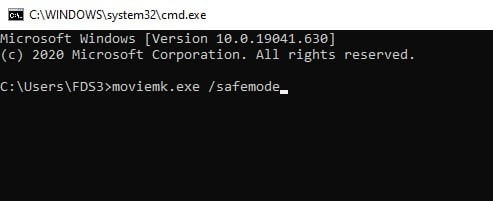
Step 2: Now proceed to open the folder containing Movie Maker by typing cd followed by the path of the folder in your Command Prompt.
Step 3: For opening Movie Maker in its safe mode, enter the command provided below:
moviemk.exe /safemode
Step 4: Expand the Tools option and choose Options from there. Now click on the Compatibility tab including the list of third-party filters.
Step 5: They will have an .ax extension. Now proceed to disable all the third-party filters from your Compatibility tab window.
After you have accomplished the entire task check whether this has made any improvement.
Method 4: Try Compatibility Mode For Your Windows Movie Maker
When you are getting the windows live movie maker has stopped working issue, try to run your Movie Maker in Compatibility Mode.
Many editors have said to fix the issue by running the software in Compatibility mode.
Some Movie Maker users have confirmed that running the software in compatibility mode can fix the stopped working error.
Here I am describing the process to execute the task. Follow the steps:
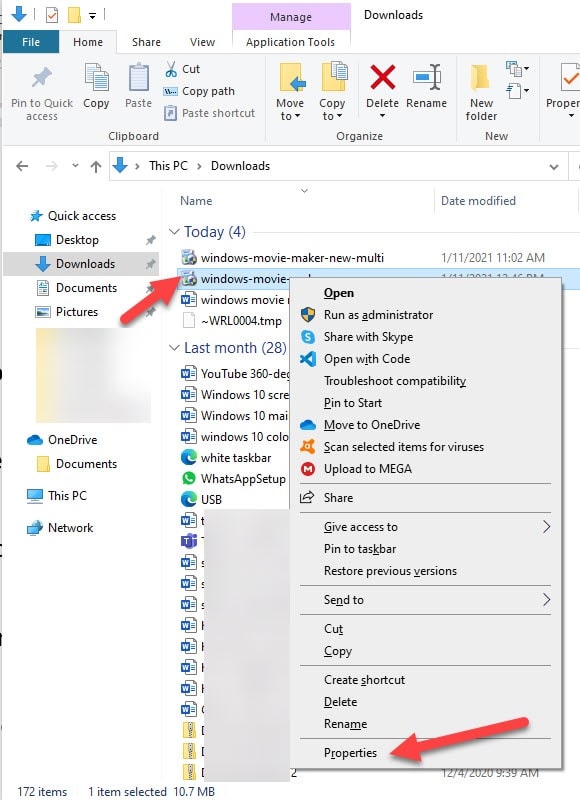
Step 1: Go to the Movie Maker app and right-click on it for selecting its Properties.
Step 2: Now choose the Compatibility Mode and choose to run the program in the Compatibility mode.
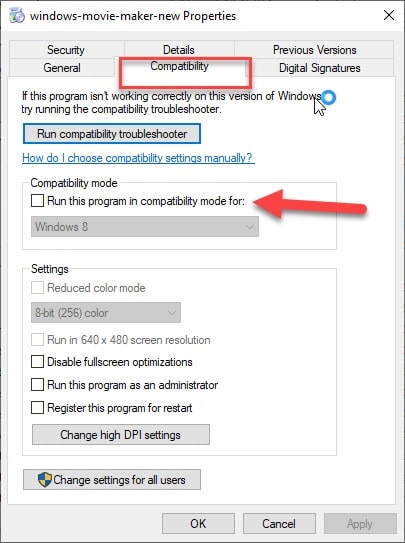
Hit the apply button followed by pressing OK to confirm your changes.
Method 5: Disable All Other Background Programs
Often some programs that are running in the background can consume a lot of energy which in turn may cause the system to crash and you might experience a sudden shutdown of the system.
You may have some games or apps that are power-intensive and some of the programs may also hog on the RAM.
Thus, the RAM may not be sufficient for Movie Maker to run properly with other apps.
So, it is highly recommended if you are running such resource – consuming programs in the background, proceed to disable those.
Here I am providing you a complete guideline of how you will execute that step by step:
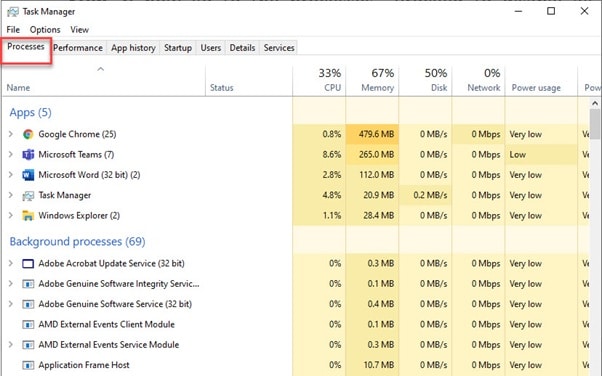
Step 1: First, go to the Task Manager and then choose the Startup Tab.
Step 2: Now go to the Processes Tab and proceed to disable all programs there.
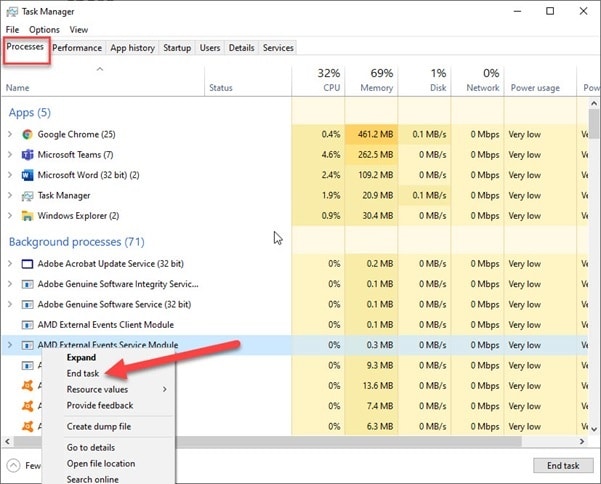
Step 3: After that for ending the task, Right-click on the programs and hit the End Task button.
Step 4: When you can check and cease all the programs, give your computer a fresh restart. And check whether issues with your Movie Maker is solved to some extent.
Method 6: Repair Windows Live Essentials Suite
Windows Live uninstaller has a repairing option that can fix up the suite’s applications.
This is another option that you may try in case windows Moviemaker is not working properly or has stopped working.
Follow the steps provided below:
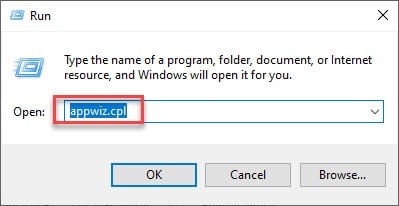
Step 1: Open the Run dialog box by pressing Windows key + R hotkey. Then type appwiz.cpl in the box and hit the Enter key.
Step 2: This will open the list of your installed programs giving you options to uninstall one.
Step 3: Now search for Windows Live Essentials and select the option as soon as you find it. Now hit the Uninstall or Change option
Step 4: And choose the Repair option for fixing up the Live Essentials applications.
Step 5: Hit the Continue button after that. Now, this is the entire process described for repairing Windows Live Essentials and after you finish the steps check whether this has solved your problem.
Method 7: Try Reinstalling Codecs
In case you are having problems with movie maker, which might be caused by some corrupted video codec on the desktop that you are using.
So, here I recommend you to reinstall codec. Codec-Sniper is a freeware program providing overview of codecs and filters on the computer.
This will clearly indicate whether you have properly installed codec along with the Status bar.
You also have a delete option there that will enable you to remove the codes.
You can download Codec-Sniper’s ZIP folder for extracting and then opening the program.
You can uninstall the packs from the Programs and Features options given on the Control panel and then reinstall codecs.
Method 8: Uninstall & Reinstall Your Windows Movie Maker
This is the last option that I may suggest you uninstall and reinstall the Windows Movie Maker to start from a blank slate once again.
But make sure that you cannot reinstall the app from Microsoft’s official website, but you can choose to download it from Softpedia, a reputable site that you may rely upon.
Step 1: Go running and enter appwiz.cpl in the dialog box. Next hit the enter key and choose Windows Live Essentials.
Step 2: Now select and click Uninstall option and hit the Continue button for removing the suite.
Step 3: Give your windows a fresh restart before you proceed to install the app once again.
Step 4: Next reinstall the Windows Live Essentials by visiting the web page and downloading it.
Concluding
So, I hope by now, you can find out the best viable option for windows movie maker troubleshooting from the given article.
If you still have queries, please communicate with us in the comments section provided below.
Feel free to shoot us a mail with your ideas or suggestions. We always look forward to hearing back from you.