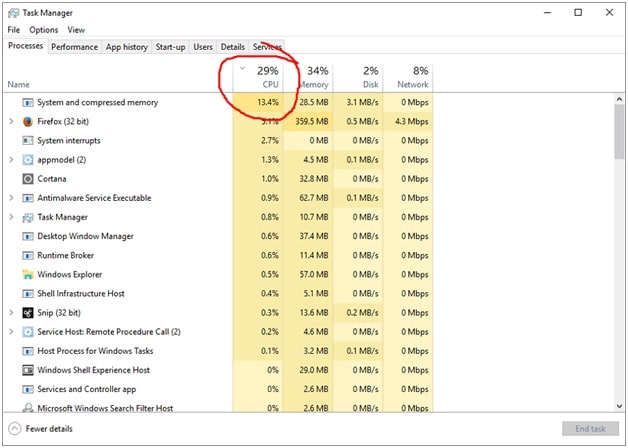
Does your PC run as slow as molasses? Well, there must be an inevitable process running in the background of your System to give you the feeling of ‘glacier’s crawl. Now, if you have already gone through the Task Manager to find out the processes running in our System, you may find out a program causing high disk usage. ‘It’s often or not the Memory Compression in Windows 10 becomes the actual culprit here.
We have gone through several Microsoft community forum. Have a look at what we have got:
”System and compressed memory are causing high disk usage.”
”Ever since the 1803 update, my system runs System and Compressed memory services constantly and its killing performance.”
Have you been through the same? Then, here we have the solution for you. Scroll through and learn the fixes from our experts.
Memory Compression In Windows 10
Having all the information about the Windows 10 memory compression does help you to resolve the problem caused by this service efficiently. That is why before going into any troubleshooting process, let’s have a clear overview of the process.
The memory compression feature in Windows 10 is actually designed to offer better performance and responsiveness to the users. Though the inclusion of the Memory Compression Process is new to Windows 10, it has been used in Linux and Macintosh operating System since long.
In the previous versions of Windows while the physical memory gets full Windows uses a file named ”pagefile.sys” as extra memory. So, when RAM gets full of the pagefile.sys stores the processes that are not in use then. Later, when RAM gets emptied the operating System loads it back into the RAM.
But in Windows 10 the whole process of preventing your PC from running out of memory has become advanced. Through the Memory Compression in Windows 10, the operating System compresses the unused pages and program files and keeps them intact with the physical memory.
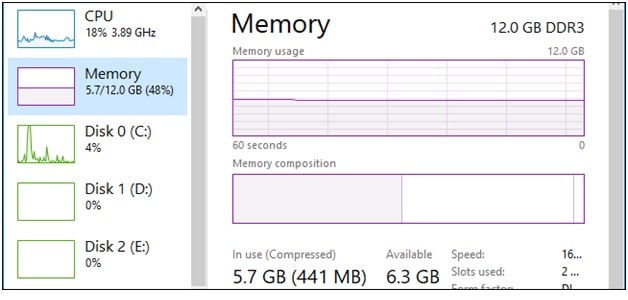
The thing is the memory compression has a bad influence as well. Actually, it uses the CPU resources to compress the data. Hence, your PC might not perform as much fast as it would have without the need for compression. The most authentic solution to fix the memory compression high RAM related issue is to insert more physical memory into your System. But as we can understand, that is not possible always we have a few workarounds to fix the problem for you.
How To Fix High CPU Usage for Windows 10 Memory Compression
Go through the troubleshooting methods one by one and fix the problem on your System.
Reset the Paging File Size Settings for All Drives to Automatic
If you have set your paging file size to a custom value then, this time, you need to reset it to automatic. So, that this way you can fix the high RAM related issue. Follow the steps here to do so,
- At first, Open the Setting from your Windows 10 operating system.
- Now, search for performance and select Adjust the appearance and performance of Windows from search results
- As the Performance Options window opens click on the Advanced tab there
- Now, click on the ”Change…” under the Virtual memory
- After the Virtual Memory window opens, check the box beside the option ”Automatically manage paging file size for all ‘drives’
- Then, Click on OK
- Finally, Select Apply and click on OK under the performance window
Problem not resolved yet? Well, you can disable both the services to troubleshoot the issue.
Disable System and Compressed Memory Process
- Firstly, Press the Windows Logo Key + X on your keyboard and from the list of options click on Control Panel to open it
- Now, search for Administrative Tools in the search bar of the Control Panel
Open Task Scheduler form the search results and double-click on the Task Scheduler Library from the left pane to expand the contents in it
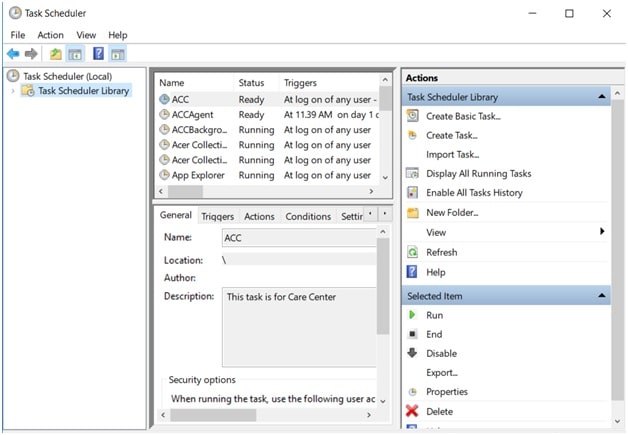
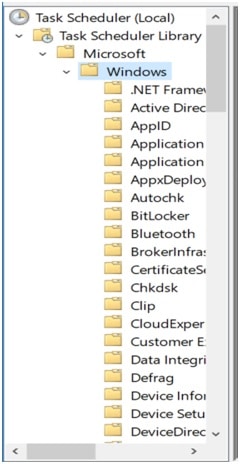
- Then, double-click on Microsoft> Windows> MemoryDiagnostic
- Now, from the right pane of the Window locate the task Run Full Memory Diagnostic Entry
- Then, right-click on the task and select disable in the contextual menu
- Finally, close the Task Scheduler and restart your PC to proceed with the changes.
Disable Superfetch
Disabling superfetch can fix your issue quite easily. There is various process following which you can disable super fetch on your System. Here we are providing you with the simplest method. Follow the steps below,
- At first, press the Windows Logo Key + R to open Run on your System
- Now in the Run dialogue box, type services.msc and hit the Enter button
- Then, locate Superfetch under the services window
- Double-click on Superfetch and select Stop
- Then, set the Superfetch ‘service’s Startup type to Disabled
- Finally, click on Apply and OK and close the service window
After disabling the Superfetch Restart your PC and you must not face the same High RAM usage related issue on your System.
Anyway, Folks ‘that’s all from our side. Hope now you have a better idea of what is Memory Compression in Windows 10 and how to fix the high RAM usage related issue due to the service. Keep following us for troubleshooting more complicated Windows 10 issues. If you face any difficulties proceeding with the steps, ask for help through the comment box below.