Users use Virtual machines to test different operating systems and run software that they may not be able to run in the main operating system. The apps and operating systems run in a virtual drive are run in a sandboxed environment, thus preventing any harmful side effects on your main operating system.
However, once the test is over, users may not have any more use of the virtual drive. Here, I shall discuss how to remove virtual drives from a Windows 10 PC.
How To Remove Virtual Drives From Windows 10 PC?
A virtual disk in Windows 10 is indexed as a separate partition, similar to how external storage devices are treated. Thus, you will need to virtually detach the virtual drive in order to remove it from your computer. There are three simple methods which allow you to do so, which I shall discuss below.
Method 1: Use Disk Partition Manager
Windows has had a built in disk manager for quite a while now, and the applet is quite easy to use as well. To remove virtual drive from your computer, use the disk manager to perform this task without any errors. Follow these steps for the same:
- Right click on the Start button, or press the combination Win + X to launch the WinX menu.
- Here, click on Disk Management to launch the Windows 10 Disk Manager.
- Here, select your virtual drive and right click on it.
- Select Delete Volume… from the context menu.
- Confirm the action is the warning dialog.
This will change the disk space to unallocated space. - Right click on the unallocated disk space and select Detach VHD from the context menu.
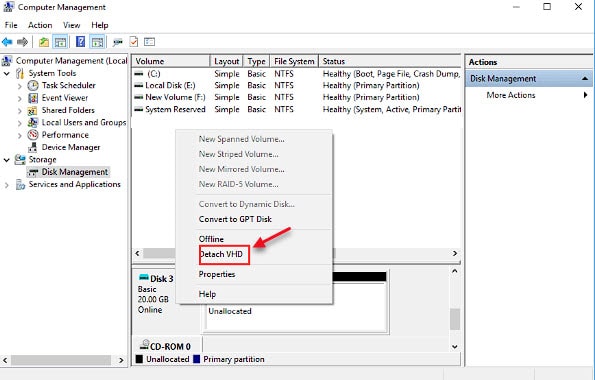
This will remove the virtual disk from your computer.
Method 2: Use Disk Properties
The next method I shall discuss involves using the disk properties dialog box to detach the virtual drive from your computer. Here are the simple steps that you need to follow:
- Use the keyboard shortcut Win + E to quickly launch Windows Explorer.
- If you are not in This PC by default, open it from the quick jump menu in the left.
- In the list of drives present, locate your virtual drive and right click on it.
- Select Properties from the context menu.
- Go to the Hardware tab and click on the Properties button again.
This will open another pop up dialog. - In this dialog box, switch to the Driver tab.
- Click on the Uninstall Device button to remove the virtual disk from your computer.
- Finally, reboot your device to finalize your changes.
Method 3: Use Diskpart
Diskpart is the command line equivalent of the Disk manager that you used in Method 1 above. Use the command line interpreter if you do not wish to use the GUI related methods above, or if you are stuck on the boot loop. Follow these steps for the same:
- Open an elevated command prompt window. If you can boot into Windows, in a Run dialog, type cmd and press Ctrl + Shift + Enter to launch the command prompt with administrative privileges.
- First, enter the disk manager by typing the following command and pressing Enter:
diskpart - Next, select your virtual disk by entering the following command and pressing Enter:
select vdisk file=”<full_path_of_the_VHD file>”
Note: replace <full_path_of_the_VHD file> with the path of the virtual disk. - Finally use the following command to remove the disk:
detach vdisk
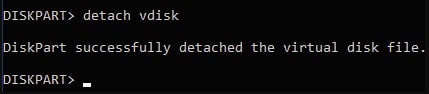
This will remove the virtual disk from your computer. Restart your device for the allocated space to be integrated with one of the other partitions, and use the disk manager to further fine tune your settings.
Wrapping Up
So there you have it. Now you know how to remove virtual drives using the methods provided above. Comment below if you found this useful, and to discuss further the same.