Do you own a Surface Pro? Then you might have noticed your device is running with different Windows 10 OS versions. J
ust like other users, you may also face issues with the Host Process for Setting Synchronization. This process consumes 20% to 100% of your CPU resources in your Windows 10 PC. In this condition, your system runs with a snail’s pace.
What to do next? How to fix it? How to bring back the mint condition of your Surface Pro?

No need to worry! Check out our tutorial, direct from the expert’s desk. Go through to know it all. Your high CPU usage issue will be fixed as soon as you adjust the SettingSyncHost.exe– the associated file of the Synchronization host process.
Let’s start now!
What Is Host Process For Setting Synchronization?
The Host Process for the Setting Synchronization syncs all of your Computer’s settings with other devices efficiently. As in, if you personalize your wallpaper in one system, your other system’s wallpaper will also be changed automatically. Not only wallpaper but this process synchronizes the changes of your OneDrive, Internet Explorer, Xbox or other beneficial applications as well.

However, the associated file with this sync process is known as “SettingSyncHost.exe file”. You will find this file within the System32 folder. Many users assume it to be a virus, but this is not true at all. It’s somewhat an important and legitimate process in Windows 10. But the problem starts when it consumes too much of your system resources. We have surveyed through a number of community forums and found 100% CPU usage for the host process is a common error in Windows 10.
Now you have the basic knowledge regarding this process. It’s time to know how to disable it instantly?
How To Fix Setting Sync Host Error?
Many Windows 10 users have bypassed this error just by disabling this process in Windows 10. But it’s just a workaround, not a permanent fix. That’s why it keeps coming back with time. Anyway, our experts’ have found quite a hand full of potential fixes for you. Until Microsoft releases an update to fix the error, you can apply our troubleshooting methods to get rid of it.
Here you go!
Update Your Windows 10 OS
You might not aware of the recent Windows 10 update. Microsoft has released it as soon as they got to know about the high CPU usage error related to Setting Sync Host. So, if you haven’t updated your Operating System yet, follow the below process to do it and fix the error followed by other bugs.
- Firstly, press the Windows logo key + “S” button at a time
- Next, write “Windows Update” in the appearing search box and hit enter
- Now, the Windows Update window will be opened
- Here you will find a button named “Check for updates”
- Click on it and give it a few minutes to search for the latest OS version
- Once you see there is any pending update, install it as soon as possible
- Finally, restart your PC just after the 100% installation of the latest version
You are done! Check whether the issue is still there. If it is, perform our next troubleshooting steps to fix it.
Add Your Ownership For The Registry Key
Sometimes, the SettingSyncHost.exe try to write a distinct directory file but can’t because it is restricted to do so. Hence, it keeps trying to write the file again and again that leads you to high CPU usage error. You can take the ownership to see if it fixes the error.
Note: You have to have the administrative privileges to perform this step.
Let’s proceed now.
- Firstly, press the Windows logo key + “R” button at a time
- Next, type “regedit” in the appearing dialogue box and press the enter button
Now the registry editor will open, locate the path- “HKEY_CURRENT_USER\Software\Microsoft\InputPersonalization\TrainedDataStore\en-GB\2”
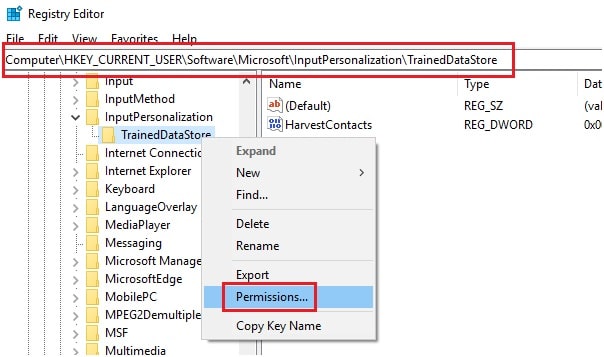
- After that, you have to right-click on the entry
- Then, select the “Permissions” option from the appearing list
- Next, hit the “Full Control” option for each user’s group turn by turn
- Finally, click on the “Apply” option to save changes
- At last, exit from there and restart your PC
Your issue must get sorted now. If it isn’t, check out the rest of our guidelines given below.
Run A PowerShell Script
You can write a PowerShell script if both of the above processes fail to heal your PC. To do so, you need to perform the below steps and have credentials for registering the job on your system.
- At first, right-click on the free space of your desktop
- Next, choose the “New” option from the appearing list
- Then, click on “Text Document” from the sub-menu of “New”
- It’s time to create the text document, name it as per your wish
- Now, double-click it to open your recently created text document to copy and paste the text-
“Get-ScheduledJob | ? Name -eq “Kill SettingSyncHost” | Unregister-ScheduledJob
Register-ScheduledJob -Name “Kill SettingSyncHost” -RunNow -RunEvery “00:05:00” -Credential (Get-Credential) -ScheduledJobOption (New-ScheduledJobOption -StartIfOnBattery -ContinueIfGoingOnBattery) -ScriptBlock {
Get-Process | ?{ $_.Name -eq “SettingSyncHost” -and $_.StartTime -lt ([System.DateTime]::Now).AddMinutes(-5) } | Stop-Process -Force
}“
- Once you are done, save this document by following- File> Save As> File Name
- Now, delete the file extension “.txt” in the file name portion and write “.ps1” (without quotes)
- Then, hit the “Save” button from the Save As window
- After that, go to the text document you have saved on your desktop and right-click it
- Now choose “Run with PowerShell” from the pop-up menu
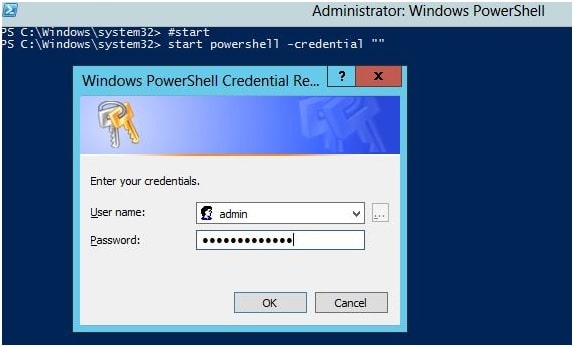
- Next, put your credentials to log in to your administrator account
- Finally, check if the high CPU usage error still persists. The issue must get fixed after performing this solution. So you are good to go now!
Winding Up
We will advise you not to skip any step of our troubleshooting methods. Also, you have to perform each solution one by one. Still, if you got a query regarding Host Process for Setting Synchronization, get in touch with our professionals just by commenting in the below box. We will help you out instantly.