Windows File Explorer has come a long way since its launch. Slowly, but regularly, many requested features are added to the File Explorer to increase the usability of the app. After a recent update the File Explorer now shows a little preview of the file (depending upon the type of content ).
Here I’ll show you how to use the preview pane and how you can disable preview pane in Windows 10.
Windows 10 Preview Pane Thumbnails
The File Explorer shows previews in the form of thumbnails for the locally stored content. This is achieved using cache files stored in the installation directory. When you open a file, a cache file for the same is created. The Explorer uses the data stored on this cache file to display previews for your file.
While the preview pane can be really helpful to some users, it can take up system resources on low-end PCs. In a folder with a lot of files, you may want to remove the preview pane Windows 10.
Also read: Windows Explorer keeps crashing
How To Disable Preview Pane In Windows 10? Complete Guide
If you do not like the preview pane, or you see system resources being used upon a folder with a large number of files here are all the methods you can use to hide the File explorer preview pane. However, note that when you disable thumbnail previews, Explorer will display icons for the files on your computer. You may also see File Explorer perform snappier than before.
Step 1: Use The View Tab To Hide The Preview Pane
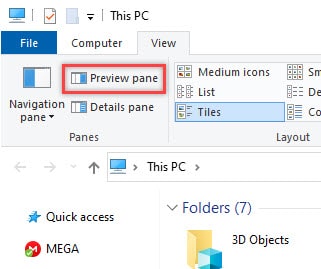
The view tab in the ribbon menu of File Explorer holds the options to enable or disable various panes in File Explorer. You can turn The preview pane on or off from this menu. follow these steps for the same:
- Open File Explorer using keyboard shortcut Win + E.
- Go to the View tab and click the Preview pane button to toggle it on or off in Explorer.
Note: Alternatively, you can use the keyboard shortcut Alt + P.
Step 2: Hide Thumbnails From The Preview Pane
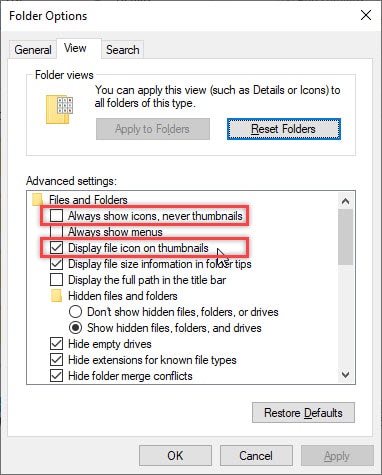
The classic folder options contain many settings that allow you to fine-tune your Explorer. you can use the folder options window to hide thumbnails and previews. Follow these steps for the same:
- Open Folder Options by clicking the Options button in the View tab from the ribbon menu.
- Go to the View tab.
- Here, check the box next to Always show Icons, never thumbnail.
Also, remove the check next to the Display file icon on thumbnails. - Click on Apply followed by OK.
Wrapping Up
So there you have it. Now you know how to disable preview pane in Windows 10 using the method provided above. Comment below if you found this useful, and to discuss further the same.