Let’s start this by saying the obvious; there is no simple way to add individual programs to the Windows 10 User Account Control exception. However, there are some tricks that you can use to bypass UAC in Windows 10. Here I shall discuss how to add a program to UAC exception in Windows 10.
Windows 10 User Account Control Exceptions
The user account control prompt is a security feature that restricts unauthorized changes to the PC. It was designed to notify the user when an application or setting is trying to change some system-level changes to the computer. This can be very helpful if some application may be trying to change some important settings without the knowledge of the user.
However, the Windows 10 UAC shows up for system-level apps as well. If there is an application that you use regularly and the UAC shows up regularly every time you launch the application, it can become frustrating. This calls for a UAC bypass in Windows 10.
Add Program To UAC Exception In Windows 10
There are two ways to bypass Windows 10 UAC exceptions; removing the prompt completely from your system and adding a single program that you use frequently to the UAC exceptions. Here I shall discuss both these methods in detail so you can easily them according to your situation.
Method 1: System-Level UAC Bypass Windows 10
If you do not want any User Account Control prompts on your computer, you can remove the prompt completely from your computer. This will allow every application to make system-level changes to your computer. While this is not recommended for general users, there might be some situations that call for such measures.
To receive no notifications for any application, follow these steps:
- Open a Run dialog by pressing Win + R.
- Type control and press Enter to launch the Control Panel.
- Change the View by to Large or Small icons according to your choosing.
- Locate and click on User Accounts.
- In the next window, click on Change User Account Control Settings.
This will open the User Account Control Settings window. - Turn down the slider to Never notify.
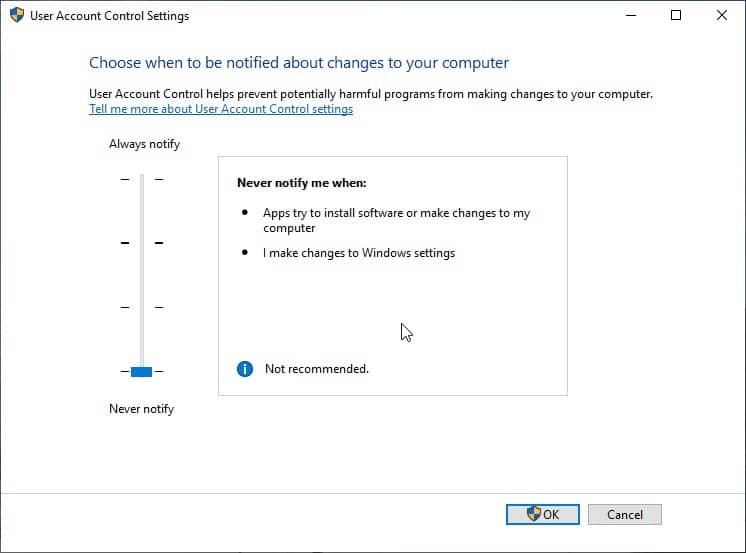
This will allow every application on your computer to make system-level changes without sending a notification to you about the same.
However, if you wish to add only a single application to the Windows UAC exceptions, here is another method to run programs elevated without UAC prompt.
Method 2: Run Programs With Admin Privileges Without UAC Prompt
If you wish to bypass UAC in Windows 10, you will need to create a task bypass in the task scheduler. Here is an example of running the Registry Editor with administrative privileges so that it does not launch the User Account Control prompt.
- Open a Run dialog.
- Type taskschd.msc and press Enter to launch the Task Scheduler GUI.
- With Task Scheduler Library selected from the left pane, click on Create Task… from the right pane.
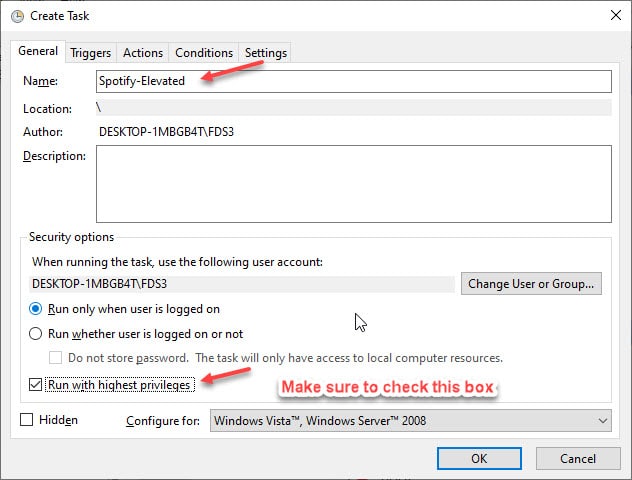
This will launch the Create Task window with 4 to 5 tabs. - Under the General tab, make the following changes:
- Name the task something easily understandable like “App-Elevated”
- Fill in a description for the same, so you can recognize it.
- Make sure to check the box associated to Run with highest privileges.
- Go to the Action tab, click on New… button at the very bottom.
This will open a New Action dialog. - Here, make the following changes:
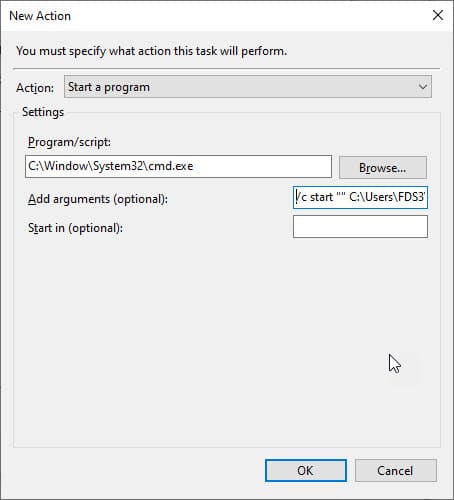
- Make sure Start a program is selected from the drop-down menu.
- Under Program/script, enter the pathname of the executable file of the application that you wish to execute with administrative privileges.
- If you wish to open the app in the foreground, open a command prompt with the app as an argument instead. For this, enter the following value under Program/script:
C:\Window\System32\cmd.exe
and add the following as argument for command prompt:
/c start “” application.exe [any further arguments] - Click on OK.
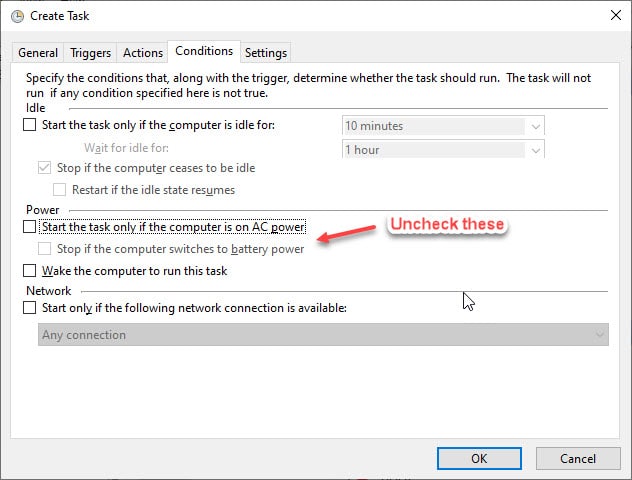
- Go to the Conditions Here make the following changes:
- Uncheck the boxes associated to ‘Start the task only if computer is on AC power’ and ‘Stop if the computer switches to battery power’.
- Click on OK.
- To test the task that you created, run it by selecting Run from the right-click context menu. You should see the app open on your computer.
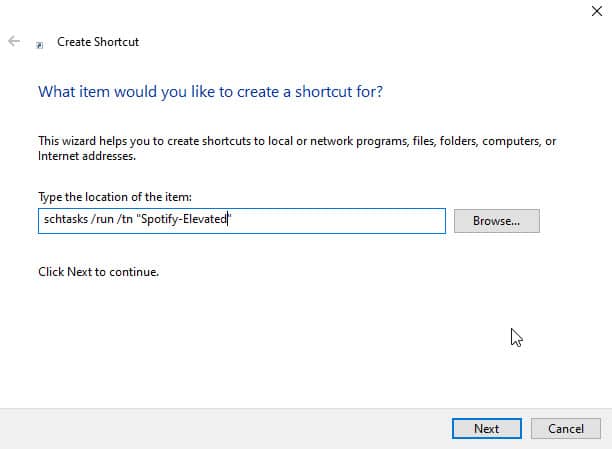
- Now, create a shortcut on your desktop that will launch the application with admin privileges. For this, right-click on your desktop and select New > Shortcut from the context menu.
- Under the location bar, use the following attributes:
schtasks /run /tn “App-Elevated”
Note: This is the same name that you used in Step 4 for the task. - Name the shortcut anything easily recognizable and choose an appropriate icon for the same.
Click on OK once you are done. You have now created an exception in the UAC prompt on Windows 10 for that particular application.
Wrapping Up
So there you have it. If the situation calls for it, now you know how to add a program to UAC exception in Windows 10 using the methods provided above. Did you find this useful? Comment below if you did, and to discuss further the same.
Thanks a lot! I was really trying to figure out how to make a UAC exception only for a specific app. I really appreciate your method.
Thank you for this post, I’ve learned how to make my life a bit easier.
Glad you found this useful. Do share the good word.
I tried this on my Admin Account and it works fine however when I switch to my basic user account and try to run it nothing happens is there something that needs to be done so the shortcut can be used in between the two accounts?
Same here. I need this to work from a standard user account. If I’m logged in as an admin I can run the software without all this rigmarole.
I created the script, but when I run the shortcut I get the same UAC pop-up, but this time its to run the Task Scheduler Configuration Tool. So it looks like I have the same problem just to run the script?
I can not save the task. I always have a pop-up saying that i have unknown account or invalid account. I do not understand. I am sure off my accounts
I did this for Windows 8.1. Instructions were clear and happily got Windows Media Player 9 to run on Windows 8.1 without asking for UAC authorisation every time I open the player.
The only thing I did different was that I selected the program Windows Media Player to run in “Actions” without using any CMD arguments, I was a bit confused to why this was needed to run in the foreground as I did fine with just selecting the program from the list.
I created the shortcut and moved it into my start menu and works like a charm.
Much obliged.
Awesome!
Thanks for figuring this out. 🙂
Okay… the task runs if I run it from task scheduler – but not from the shortcut.
Used the same name, etc, nothing. :/
So… not happening for me.
Same here. test fine is scheduler but wont run from shortcut.
I removed the ” ” signs and then it worked for me.
You are The BOSS. Thanks
Thank you!
Same result as Silke. My “Location” in the Shortcut is:
C:\Windows\System32\schtasks.exe /run /tn “v12-5”
I have verified that “v12-5” matches the Task Name under the “General” tab in the Task Scheduler.
Suggestions would be most appreciated.
Worked perfectly for launching a GPU overclocking software without the UAC popping up every time. Thank you very much!
FIX:
As some others already commented, the shortcut did not work for me but I found the problem: after C&P the quotation marks are wrong, with minimal visible difference: “” . Just remove the pasted and type in the correct ones where needed.
FIX: in the tab triggers you have to create new trigger At Log On of Any User. Now it’s working for me
You are right. Need refill them manually. Thanks!
Thank you, this worked great
This works, BUT you have to change the ” to ” < VERY important if you just copy paste it.
Hope the author will fix it.
Other than that thanks for a great guide 🙂
Thanks for publishing this tip. I was able to use Method #2 to start thinkorswim.exe on Windows 11 without the UAC prompts. I can now start the program from scripts in Excel when I need it.